30 Most Important Things to Do After Installing WordPress (2024)
One of the most important questions that lots of users frequently ask is what exactly to do right after installing WordPress. As you know WordPress is a great CMS that…
One of the most important questions that lots of users frequently ask is what exactly to do right after installing WordPress. As you know WordPress is a great CMS that helps you to create your website very quickly without any coding! But when we install WordPress, it has a lot of preset options. Some of them should be removed, changed, or configured specifically according to the purpose of our website.
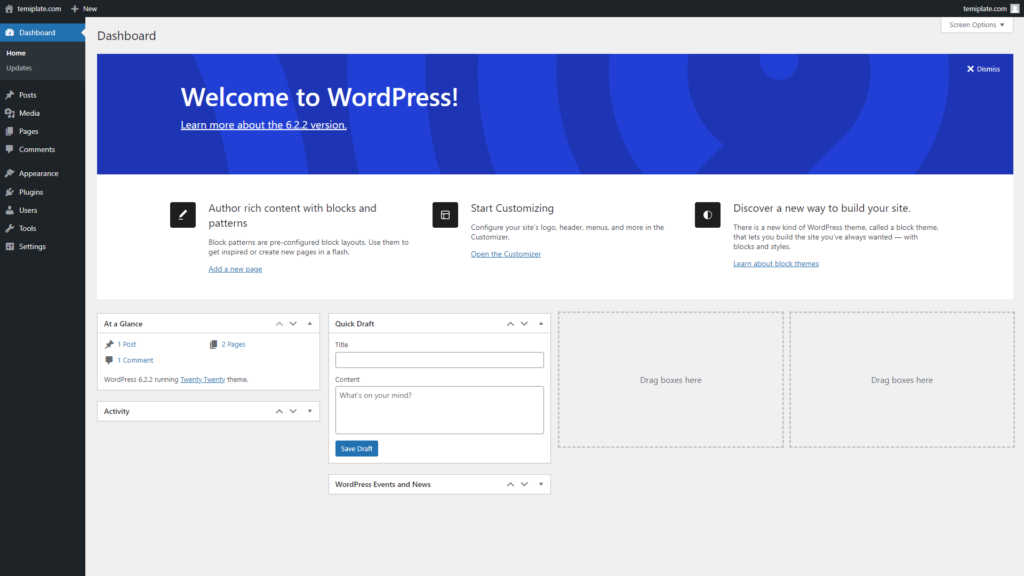
Lots of people don’t know what things they must do exactly after installing WordPress to have the best experience using WordPress. We can have a better website with more security and speed, as well as a better performance if we know and do it the best way.
So, it’s time to check out the list of all things that must be done right after installing WordPress. So, Let’s check the principle parts of this article and get a strong started together:
Part 1: Cleaning up Unnecessary Things
Part 2: Changing Default Options
Part 3: Installing Necessary Tools
Part 1: Cleaning up Unnecessary Things: First, we are going to clean up the WordPress environment and delete unnecessary things after installing WordPress.
1. Delete Unused WordPress Themes
After installing WordPress, go to Dashboard » Appearance » Themes. Some default themes are not necessary and you should delete them forever! Because each WordPress website can have only one theme activated at a time. Moreover, some people often like to install different themes, as they want to test them and select the best one for their site. But, unfortunately, they sometimes forget to delete those unnecessary themes from their website. So if you have had, tested, or installed some unused themes and now you have abandoned them, consider deleting them all (Except one! Explained below).
It can be a good idea to leave just one extra theme to be installed on your website. Just one! Sometimes, some unexpected issues occur suddenly, and your website is exploded! Issues like “WordPress White Screen of Death” or “plugin conflicts” or some things stuff like that. If you had another theme installed on your site at these special times, it would be able to help you find the problem by deactivating and changing your main theme to that theme. So always have only one extra theme beside your main activated theme for a rainy day!
Please notice that whenever you want to test some different WordPress themes to choose one of them for your website, be sure to do these tests on a local host or a sandbox (like wpsandbox.net). Because your business site is not a laboratory to test multiple different choices! These tests can make your database too dirty and heavy so they can have negative effects on your website’s speed and performance. So never test different themes on your real website after installing WordPress.
2. Delete Unused WordPress Plugins
Before that Let’s know why we should delete unused WordPress plugins. Unused plugins can slow down your website. They can be a security risk and can cause conflicts with other plugins. By deleting unused plugins after installing WordPress, you can improve the performance, security, and stability of your WordPress website. So let’s go to delete them all!
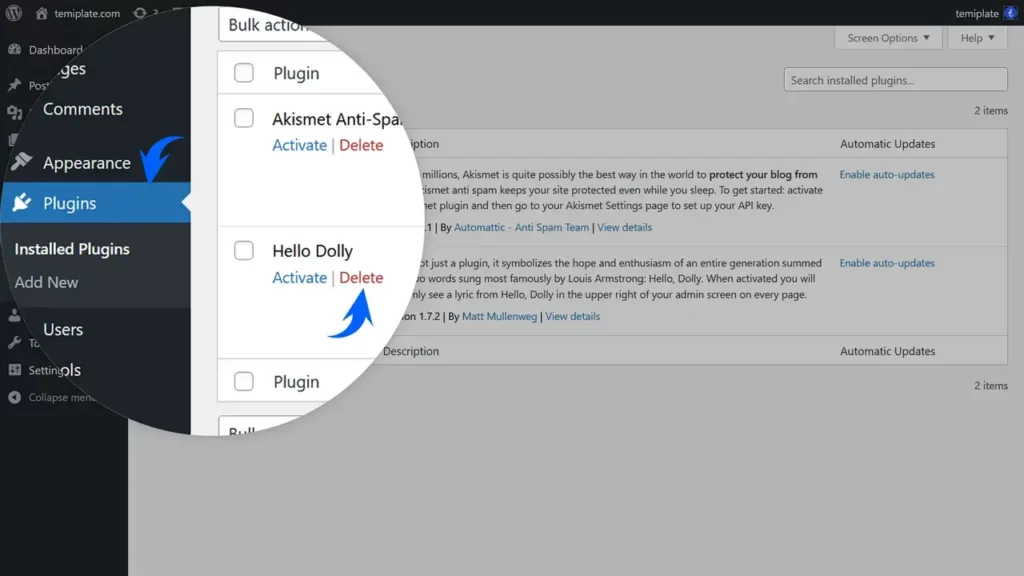
Inside the WordPress Dashboard, go to Plugins » Installed Plugins. You can see there are two pre-installed plugins. They are “Hello Dolly” and “Akismet”. You may need to use Akismet for your site. But, definitely, Hello Dolly is a useless plugin that must be deleted. The “Hello Dolly” was one of the very first WordPress plugins that were created. It was written by Matt Mullenweg, co-founder of WordPress in May 2004. It has no practical purpose so you can delete Hello Dolly after installing WordPress without having any negative impacts on your site.
We strongly recommend that you delete ALL plugins that you’re not using on your site (not just Hello Dolly). Never keep unused plugins on your site, whether they are activated or deactivated. Delete them all and let your site take a breath with useful plugins that must be active.
3. Delete Default Comments
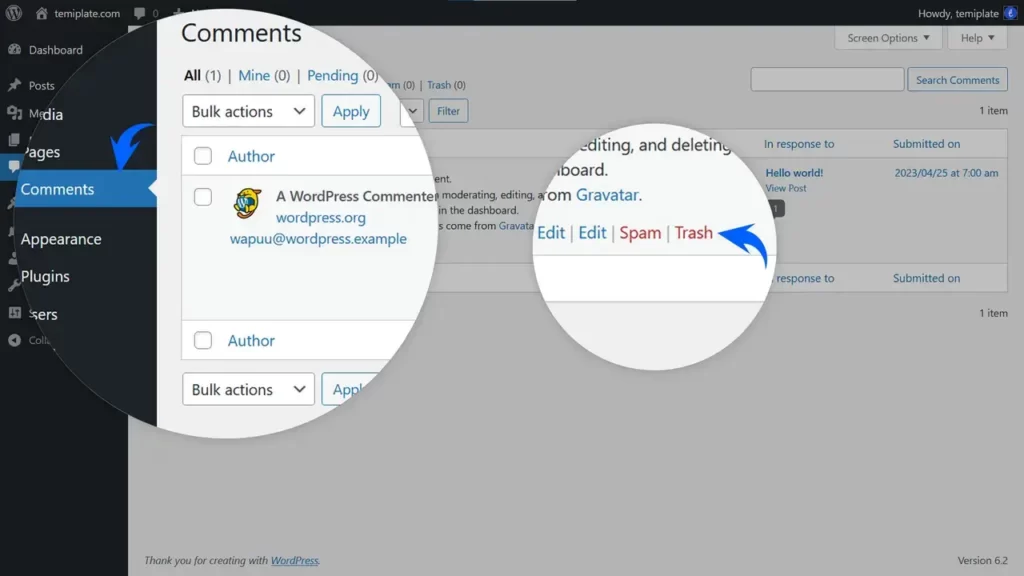
WordPress has some sample contents even at the very first moments that you have installed it. They are never going to be useful for you and your site so they must be deleted forever. Let’s start with cleaning up the default comments after installing WordPress. Visit the Dashboard » Comments page and then delete the default sample comment by clicking on the “Trash” link.
4. Delete Default Posts
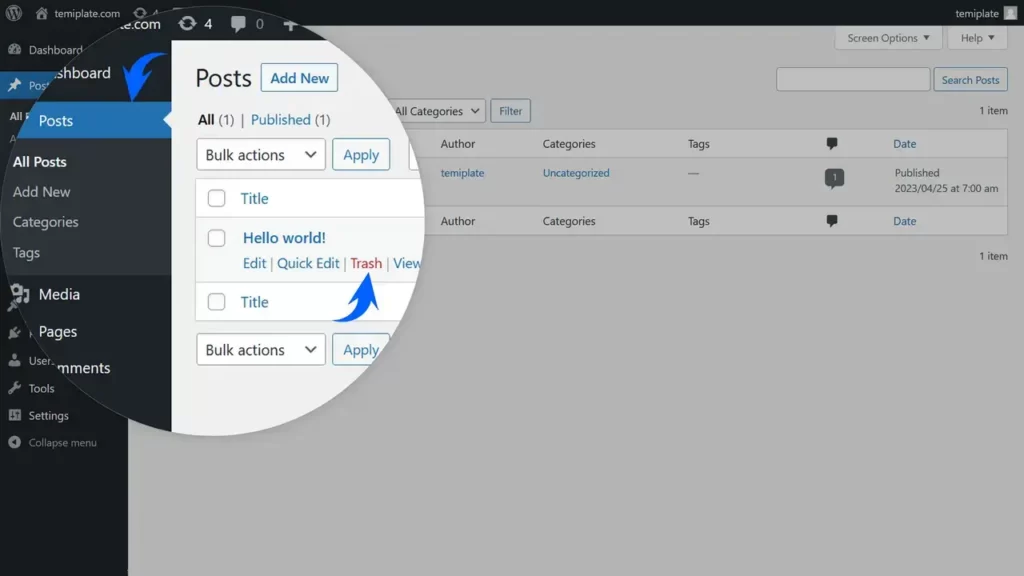
In the continuation of cleaning the site from default contents after installing WordPress, it’s time to go to Dashboard » Posts. You can see a sample post named “Hello World” there! it is not the post that you like to publish on your site. All its purpose is maybe to show you what the posts are and how you can write them! So we delete it by clicking on “Trash” because we don’t need it anymore! Finally, we go to the trash and delete it permanently!
5. Delete Default Pages
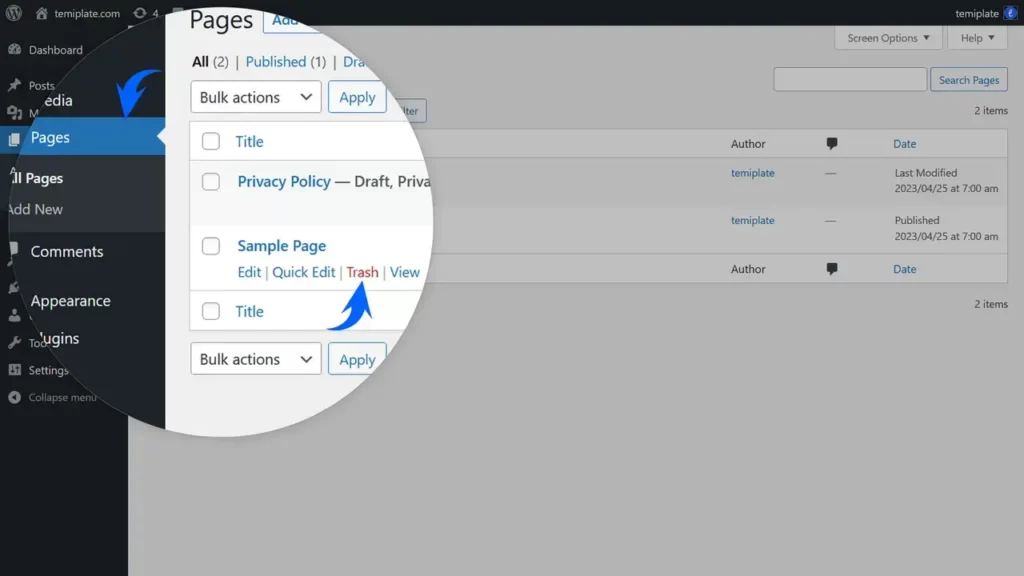
Lastly, we will say goodbye to the WordPress default page after installing WordPress. To do that, you should go to Dashboard » Pages. You can see a page named “Sample Page” there. Hover over the name of it and click on Trash. Finally, go to trash and delete it permanently!
That’s it. Part 1 of our article is done!
Part 2: Changing WordPress Default Options: Below, we are going to configure the preset options that WordPress sets by default. So we want to change the default settings to what we prefer for our business after installing WordPress.
6. Change the Site Title and Tagline
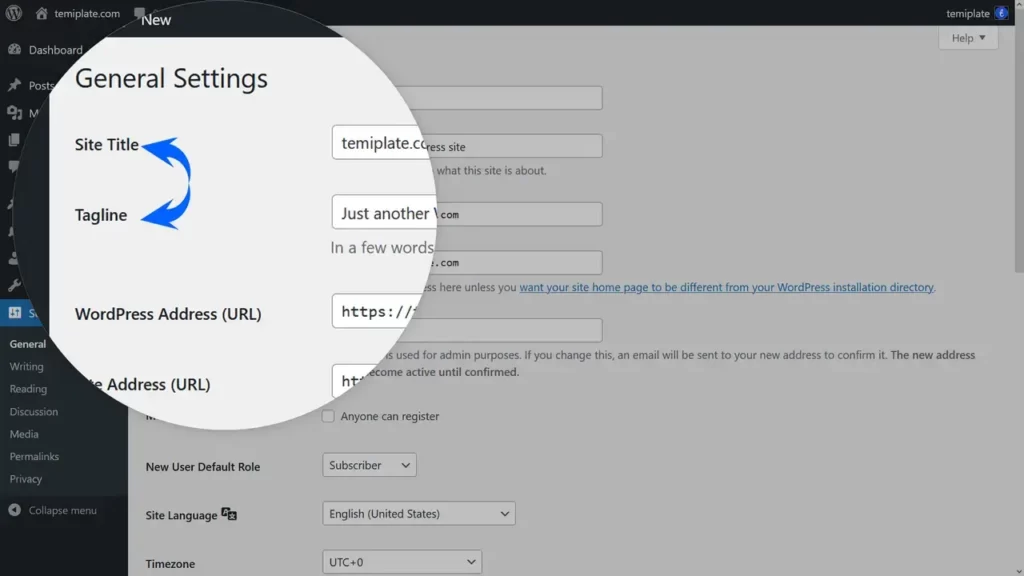
When you install WordPress, you’re prompted to enter a title for your website. However, you can modify this at any time after installing WordPress by navigating to your Dashboard » Settings » General. The first two fields on this page allow you to alter your “Site Title” and “Tagline.” Let’s delve into what the WordPress Site Title and Tagline mean.
Understanding Your Site Title: Your site title serves as your brand identity. It’s how people distinguish your website from the multitude of others on the internet. Selecting the ideal title for your site hinges on comprehending your site’s objectives.
Deciphering the WordPress Tagline: The WordPress tagline is a concise summary of your entire website. Some individuals opt to use the same tagline as their WordPress site title, while others prefer to employ a distinct tagline to offer a more precise description of their websites.
7. Change Timezone Settings
After installing WordPress, to adjust the timezone settings in WordPress, follow these steps in your Dashboard » Settings » General:
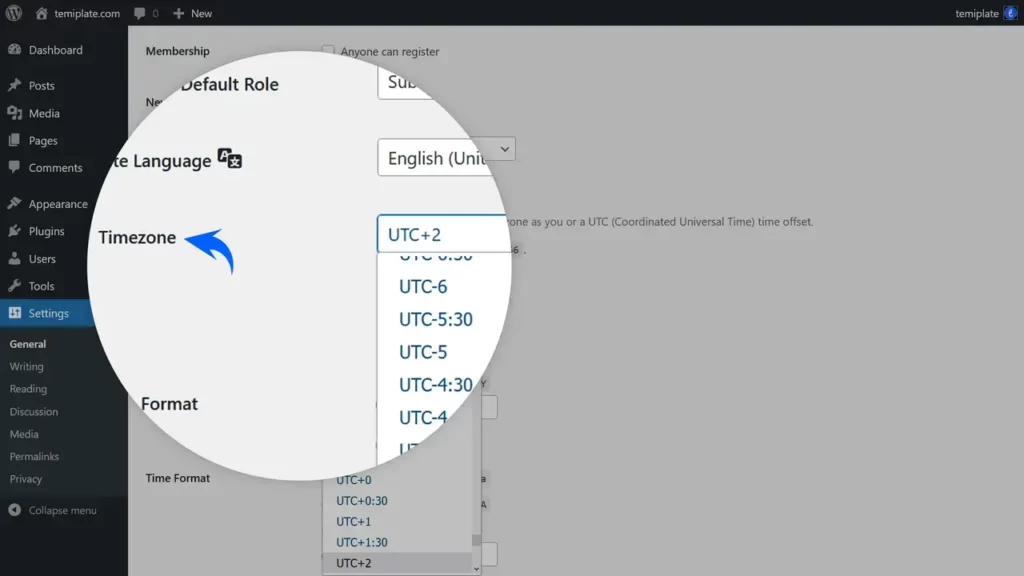
- Scroll down to the “Timezone” section.
- Ideally, select the nearest city in your current time zone. Using a city is preferred over choosing UTC options because it accounts for Daylight Savings Time changes.
- If none of the cities listed in the timezone settings match your current location, you can manually determine your timezone. WordPress provides the current Coordinated Universal Time (UTC), enabling you to calculate your time accordingly.
Important Note
If you manually select a UTC timezone, WordPress won’t automatically account for Daylight Savings Time (DST) changes. You’ll need to manually adjust the offset twice a year, on the last Sunday of April and the last Sunday of October. Therefore, it’s advisable to select a city near your timezone after installing WordPress, as WordPress automatically updates your time for DST changes.
8. Change the Date and Time Format
Showing the date and time on your site is important. Lots of elements and sections in the site need to have a date or time. As you know date & time can be displayed in many ways. Consequently, you may want to show the date and time differently than the default settings after installing WordPress.
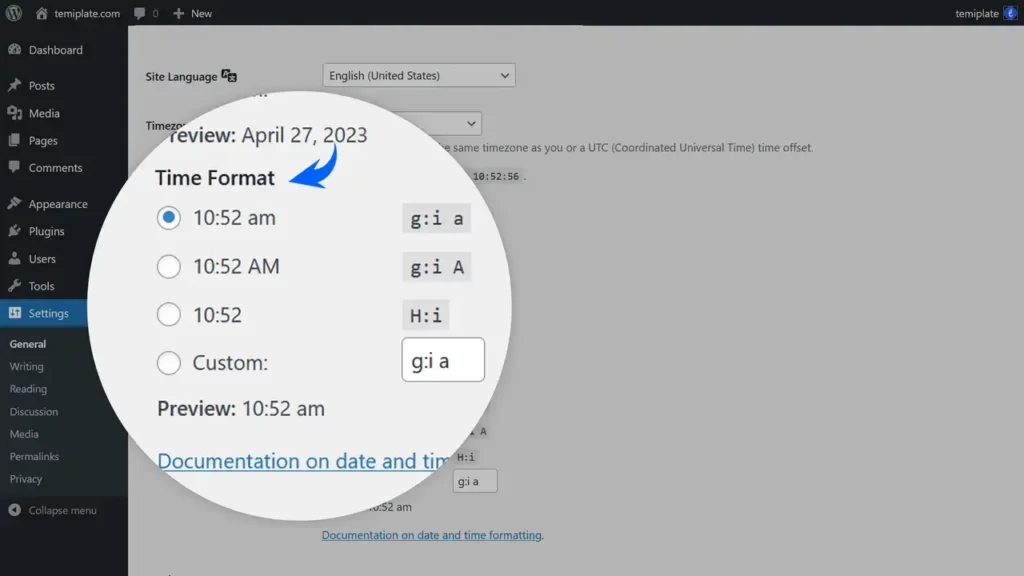
To change the date and time format in your site after installing WordPress, simply go to Dashboard » Settings » General. Then scroll down to get to the date format section. As you can see, WordPress has built-in functions that allow users as well as developers to format dates and times.
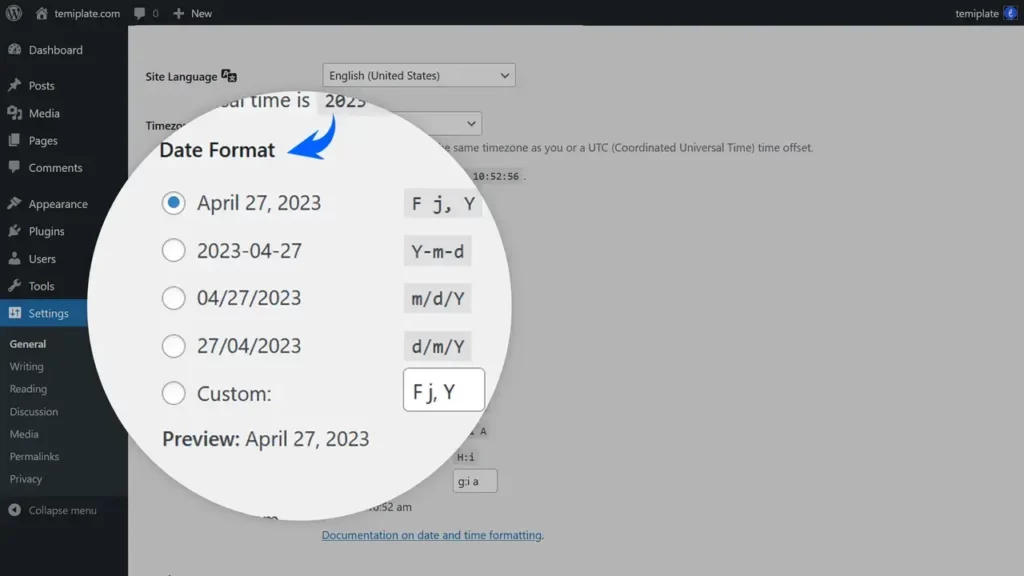
The last option for both date and time is a custom format. If you want to create a unique format not covered by the default presets after installing WordPress, follow these instructions:
- D – The date of the month in 2 digits, such as 31 or 05
- M – The month in number, such as 03 for March
- Y – The year in four digits, such as in 2020
- y – A lower-case y displays the year in 2 digits, such as 20
- L – The day of the week, such as Friday or Saturday
- F – The month in text, such as October
- H – The hour
- i – The minutes past the hour
- S – The Seconds
9. Configure the Permalink Structure
This part of the article is particularly vital to notice after installing WordPress. Permalinks, a fusion of “permanent” and “links,” are URLs that should remain constant on your website. You set them once, and ideally, they never change. WordPress, by default, uses the following URL format for displaying posts and pages:
https://example.com/?p=73
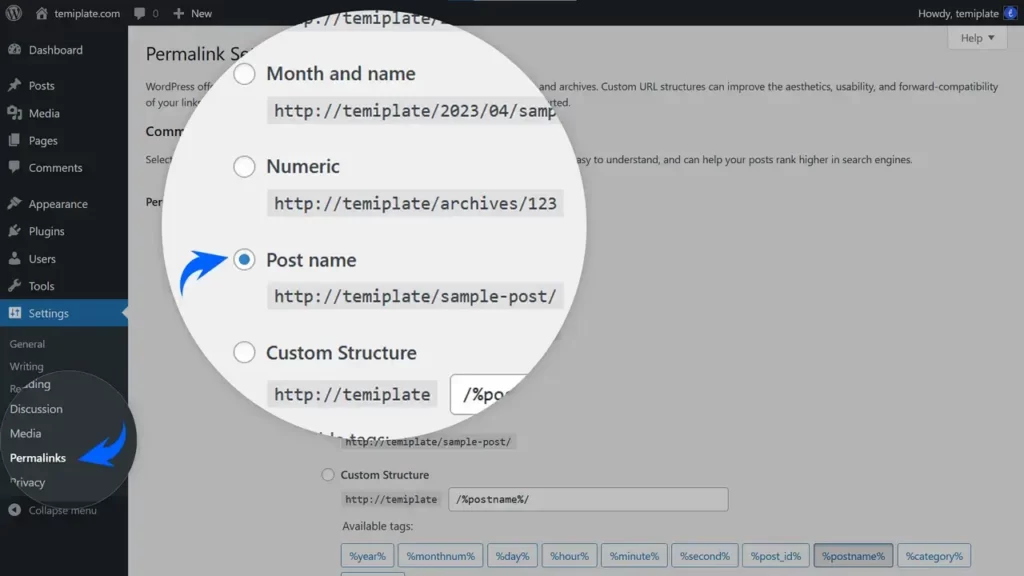
However, this default WordPress permalink structure, which relies solely on post ID numbers, isn’t very user-friendly or SEO-friendly. They lack memorability and readability.
The good news is that WordPress has built-in functionality to customize the permalinks. If you go to Dashboard » Settings » Permalinks after installing WordPress, you can change the permalinks structure with just a few clicks.
The best permalink structure for SEO is simple and easy-to-understand URLs. Your permalink should be your primary target keyword and it should be easy to read. The “Post Name” is the best choice that I highly recommend. Set it after installing WordPress, and forget about changing it forever.
10. Change the Default Category
WordPress features an inherent taxonomical structure with categories and tags as default taxonomies. Each post must be assigned to a category, and it’s advisable to create custom categories and tags to maintain an organized website.
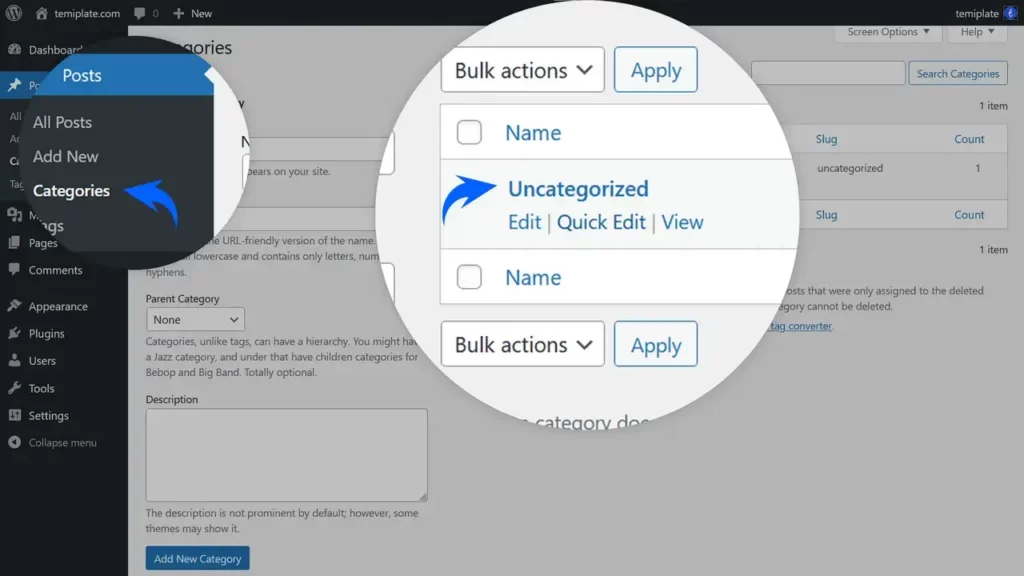
After installing WordPress, if you haven’t established any custom categories, your posts will automatically fall into a default category named “Uncategorized”. This name isn’t very appealing, so let’s change it together.
To change the WordPress default category, go to Dashboard » Posts » Categories. Hover over your mouse on the name of the “Uncategorized” category. Click on “Quick Edit” and change its name and its slug to anything you would like. For example, It can be something like “General”, “Basic”, etc.
There is another way to do it after installing WordPress. You can Add a new category and make it default. Then delete the previous one. Here are the steps to change the default category in this way:
- Login to Your WordPress Dashboard: Log in to your WordPress admin panel using your username and password.
- Navigate to the Categories Page: Once logged in, go to the “Posts” section on the left-hand menu and select “Categories.”
- Create a New Category:
- Click on the “Add New Category” link.
- Enter the name you want for the new default category.
- You can leave the Slug and Parent Category fields empty.
- Change the Default Category:
- Go to “Settings” in the left-hand menu and select “Writing.”
- Look for the “Default Post Category” option.
- Open the dropdown menu and select the category you just created.
- Save Changes:
- Scroll down to the bottom of the page and click the “Save Changes” button.
- Delete the Previous Category:
- Finally, go back to the Dashboard » Posts » Categories. Then delete the “Uncategorized” category.
Now, any new posts you create will be assigned to the category you specified as the default instead of the “Uncategorized” category. So we have a well-named category after installing WordPress.
Please note that if you have existing posts in the “Uncategorized” category, you may want to go back and reassign them to the new default category you’ve just created. You can do this by editing each post and selecting the appropriate category.
Keep in mind that changing the default category doesn’t affect posts that were published before the change; they will remain in their existing categories unless you manually update them.
11. Configure Comment Settings
One of the simplest and most effective ways to foster community engagement and useful interactions among your website’s visitors is by using the WordPress Comment System. This feature not only encourages discussions but can also benefit your site’s SEO when search engines index this user-generated content.
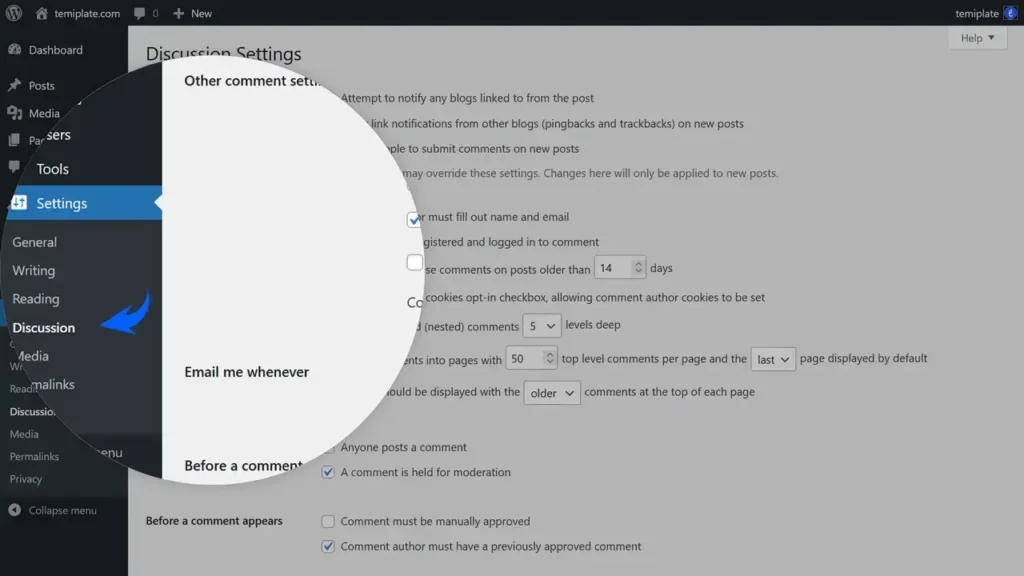
To Configure WordPress Comment settings after installing WordPress, simply go to Dashboard » Settings » Discussion.
Within the Discussion Settings, you’ll find various options to customize how comments are handled on your site. Here are some key settings you can configure:
- Enable/Disable Comments: You can choose to enable or disable comments on your entire site or individual posts and pages.
- Comment Notifications: Decide whether you want to receive email notifications when someone leaves a comment. This helps you stay updated on user interactions.
- Comment Moderation: You can enable comment moderation, which allows you to approve or disapprove comments before they appear on your site. This helps in preventing spam and maintaining the quality of discussions.
- Comment Blacklist: You can create a blacklist of specific words or phrases to automatically filter out comments containing inappropriate content.
- Avatar Display: You can select how avatars or profile pictures of commenters are displayed, making your comment section visually appealing.
- Comment Pagination: Configure the number of comments displayed per page, ensuring a smooth and organized reading experience for your users, especially on lengthy comment threads.
These settings are highly customizable after installing WordPress, and you can adjust them to suit your specific needs. Properly configuring comment settings is essential to manage discussions effectively and maintain the quality of user interactions on your WordPress website. It also contributes to enhancing your site’s SEO by encouraging engagement and fresh, user-generated content.
12. Configure Front and Blog Pages
When WordPress CMS was released in 2004, it was only a tool for creating blogs. When you Install a fresh WordPress website, It still has a blog structure by default. It means all of your blog posts will be displayed on the homepage after installing WordPress.
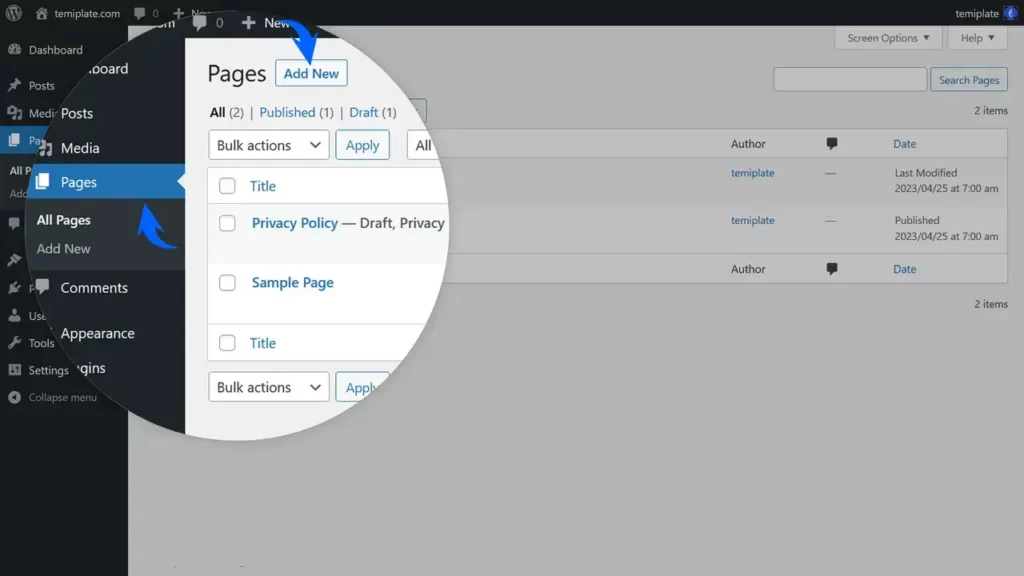
So, if you want to have a specific homepage after installing WordPress, you should change its structure. But before that, you should add two new pages from the Dashboard » Pages » Add New. Create a page with the name of Home and publish it. Then do the same and publish a page with the name of the Blog. Now we have a Home page and a Blog page like every other website.
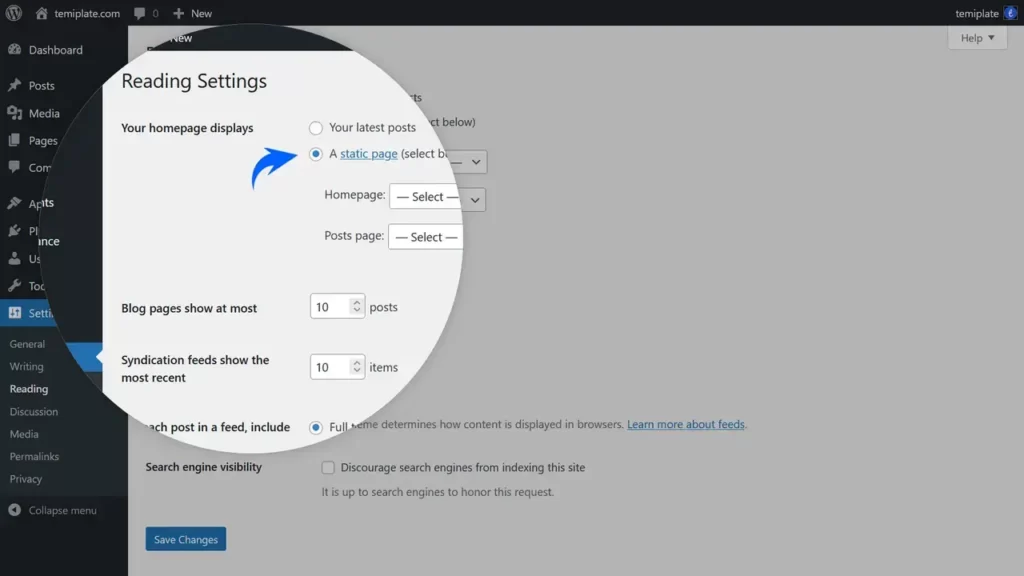
Finally, to change the WordPress front page structure, go to Dashboard » Settings » Reading. You have two options in the “Front Page Displays” section. Click on the “A static Page” option, Then select your Home and Blog pages as “front page” and “posts page”. That’s it.
13. Complete Your User Profile
WordPress has a user management system in itself. Each user in WordPress has a personal profile that can complete their information. As an administrator, You can change and complete your user profile from the dashboard very easily after installing WordPress.
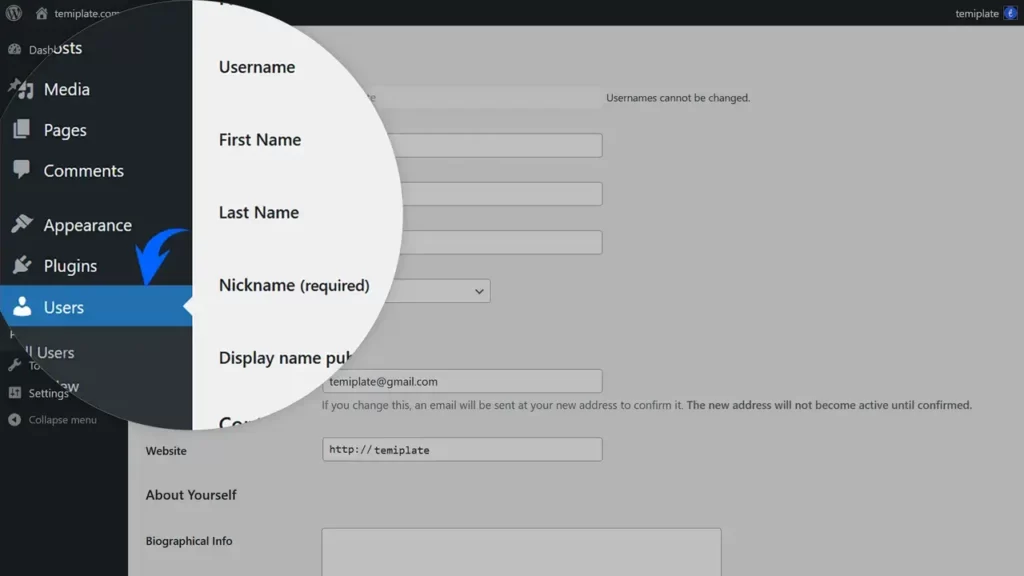
To complete your WordPress user profile information, simply go to Dashboard » Users » Edit Profile. The “Edit Profile” page in WordPress allows users to manage various aspects of their profiles, including user information and author bios. Here’s an overview of what you can find on the Edit Profile page after installing WordPress:
- Name:
- First Name and Last Name: These fields allow you to enter your real first and last name.
- Nickname: This is a user-defined nickname or alias. It’s often used as the name that appears alongside your posts.
- Display Name: This dropdown menu lets you choose how your name will be publicly displayed on your posts and comments. You can select options such as “First Name Last Name,” “Nickname,” or other variations.
- Contact Info:
- Email: You can update your email address here after installing WordPress. Be sure to provide a valid email address because important notifications and password reset links are sent to this address. Note that, If you change your Email from these settings, you have to confirm a verification email that will be sent to you from your website. Otherwise, you can change the email from PHPMyAdmin.
- Website: Enter the URL of your website or blog if you have one.
- Twitter: If you have a Twitter account, you can enter your Twitter username here, which may be displayed on your profile.
- Facebook: Similarly, you can enter your Facebook profile URL if you want to connect your Facebook page to your profile.
- About Yourself:
- Biographical Info: This text area allows you to write a short biography about yourself. It’s an opportunity to tell your website’s visitors a little more about you as the author. This bio can be displayed on your author archive page or author widget if your theme supports it.
- Account Management:
- New Password: You can change your password here after installing WordPress. It’s a good practice to update your password regularly for security reasons.
- Session Management: If you’re concerned that your account may be accessed from multiple locations, you can log out of all other sessions except your current one.
- Additional Capabilities: This section might show additional user capabilities depending on your site’s setup. It’s generally used for adding or removing user roles and permissions.
- Personal Options:
- Admin Color Scheme: You can choose the color scheme for your WordPress admin dashboard.
- Keyboard Shortcuts: Enable or disable keyboard shortcuts for comment moderation.
- Toolbar: You can choose to show or hide the admin toolbar on the front end of your site when you are logged in.
Once you’ve made your desired changes after installing WordPress, remember to click the “Update Profile” button at the bottom of the page to save your settings. These profile settings are essential for personalizing your user experience and presenting yourself as an author on your WordPress site.
Important Note
By default, WordPress uses your Username for the Nickname and Display Name. It is highly recommended to change your Nickname and Display Name to be different from your Username because of security reasons. It is better to keep your username hidden from everyone. Hackers may use it to access your site a little easier if they can guess your Username from the Display Name.
Do you need to change your “Username” after installing WordPress?
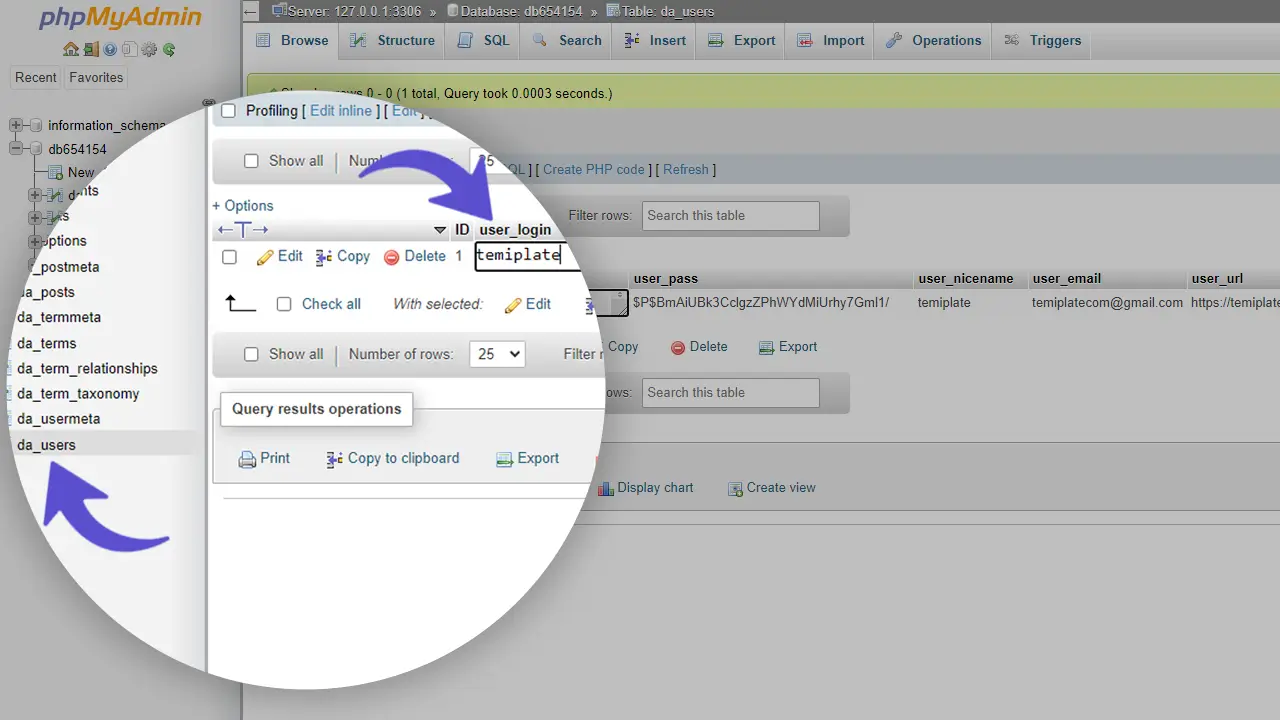
It is possible from your Host » PHPMyAdmin » Your DataBase » wp_users Table » user_login field.
14. Upload Your Gravatar Profile Image
WordPress defaults to using Gravatar to display user profile images on the site. Gravatar, short for “Globally Recognized Avatar,” serves as a profile image hosting service, enabling users to have a consistent profile image across numerous websites where they’ve registered with the same Gravatar email. To set up your Gravatar profile image after installing WordPress, follow these steps:
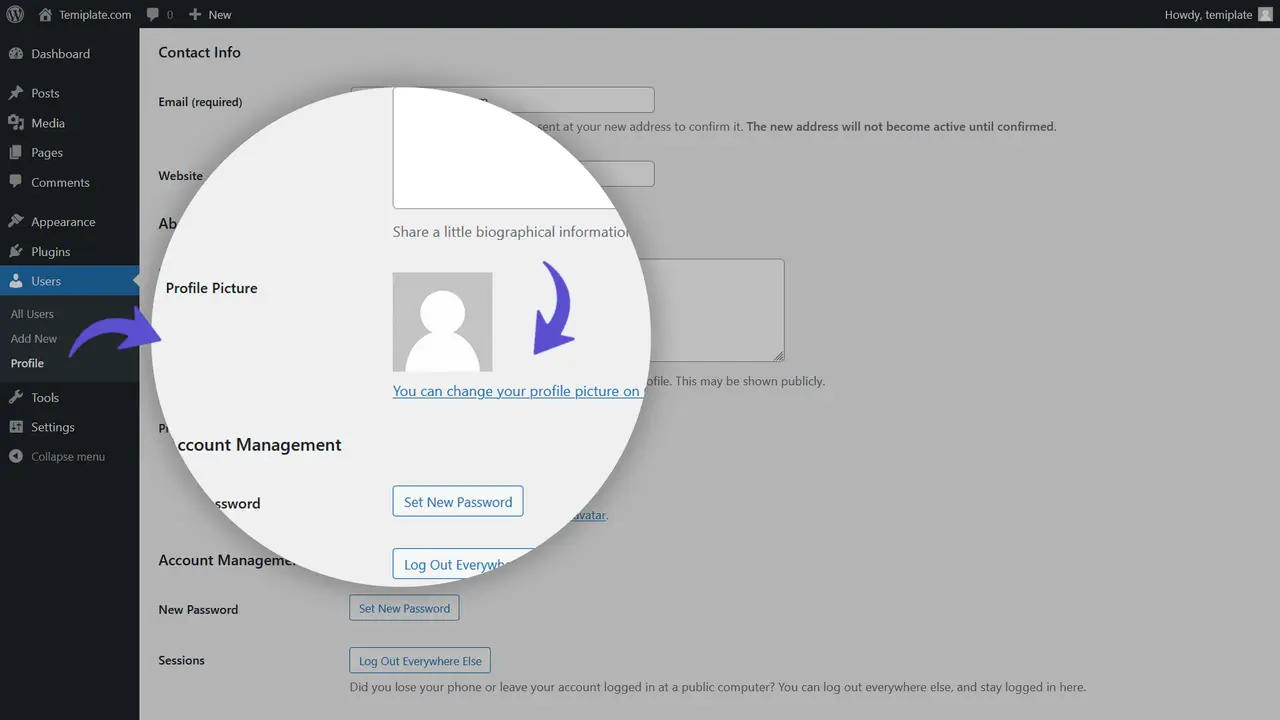
- Create a Gravatar Account:
- Start by going to Gravatar’s website and follow Gravatar Documentation for uploading your first Gravatar profile image. The process typically involves the following steps:
- Uploading a profile image.
- Create an account using the same email address associated with your WordPress account.
- Start by going to Gravatar’s website and follow Gravatar Documentation for uploading your first Gravatar profile image. The process typically involves the following steps:
- Use the Same Email:
- It’s crucial to use the same email address on Gravatar that you’ve linked to your WordPress account. This ensures that your Gravatar image will be displayed on all WordPress websites where you’ve registered with that email.
- Benefits of Gravatar:
- Mention the benefits of Gravatar, such as consistent branding across multiple websites and the convenience of having a single profile image for various online platforms.
By providing clear, step-by-step instructions and emphasizing the advantages of using Gravatar, your readers will better understand the importance and benefits of setting up a Gravatar for their WordPress profiles.
15. Upload a Favicon or Site Icon
When you open a site using your browser, you can see a small icon beside the tab title at the top of a web browser. they’re also found on your browser’s bookmark bar, history, and search results, alongside the page URL. Each site has a site icon that is called a favicon. So your website needs to have its favicon after installing WordPress.
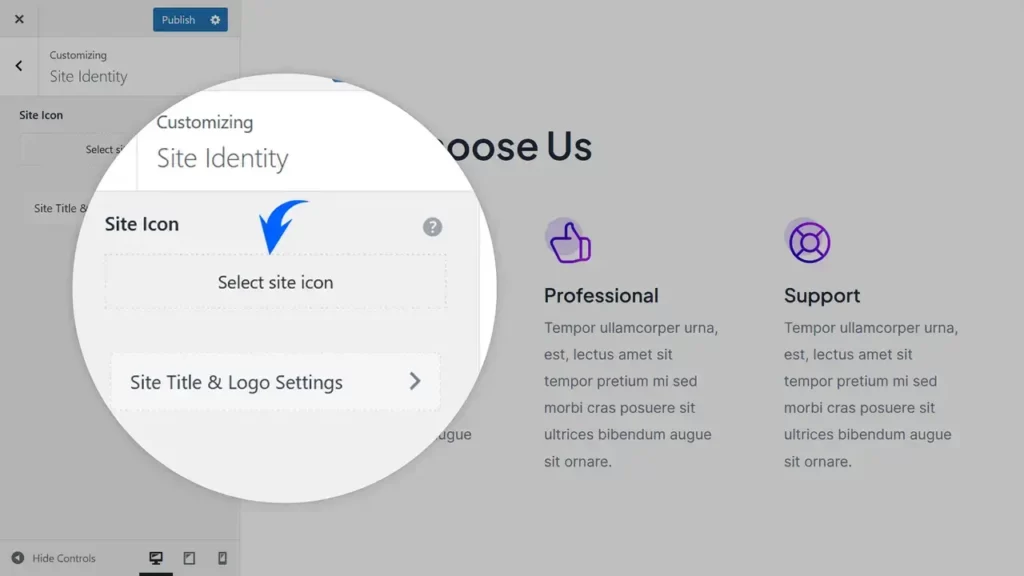
To create and upload a favicon for your WordPress website, follow these steps:
- Design Your Favicon:
- You can design your favicon using design software like Photoshop, or you can search for a “Favicon Generator” using search engines like Google. Various online tools are available to help you design a site icon. It is recommended to create an image with dimensions of exactly 512×512 pixels and save it in formats such as PNG, JPEG, or GIF.
- Uploading Your Favicon in WordPress:
- After installing WordPress, go to Dashboard » Appearance » Customize.
- In the Customizer, find the “Site Identity” tab.
- Look for the “Site Icon” section.
- click the “Select File” button to upload your favicon image.
- After uploading, be sure to save and publish the Customizer settings.
- View Your Favicon:
- Once saved, your website will display your beautiful favicon beside the tab title at the top of the web browser, providing a distinctive and professional appearance.
By expanding on the design options for favicons and offering a more detailed step-by-step guide, your readers will have a clearer understanding of the importance and process of creating and uploading a favicon to their WordPress website.
Important Note
If you don’t see the Appearance » Customize option on your site after installing WordPress and see only Appearance » Editor (Beta), then that means you are using a theme that has Full Site Editing (FSE) enabled. This feature is added from WordPress 5.8. If you install a new WordPress theme, or disable FSE then your appearance menu will be different and have Customize, Menus, and Widgets submenus.
16. Change the Administration Email Address
Every WordPress website has an administration email address used for crucial admin functions. By default, this email is the same as the user profile email provided during the WordPress installation. However, changing this email address is not only recommended after installing WordPress but essential for several reasons.
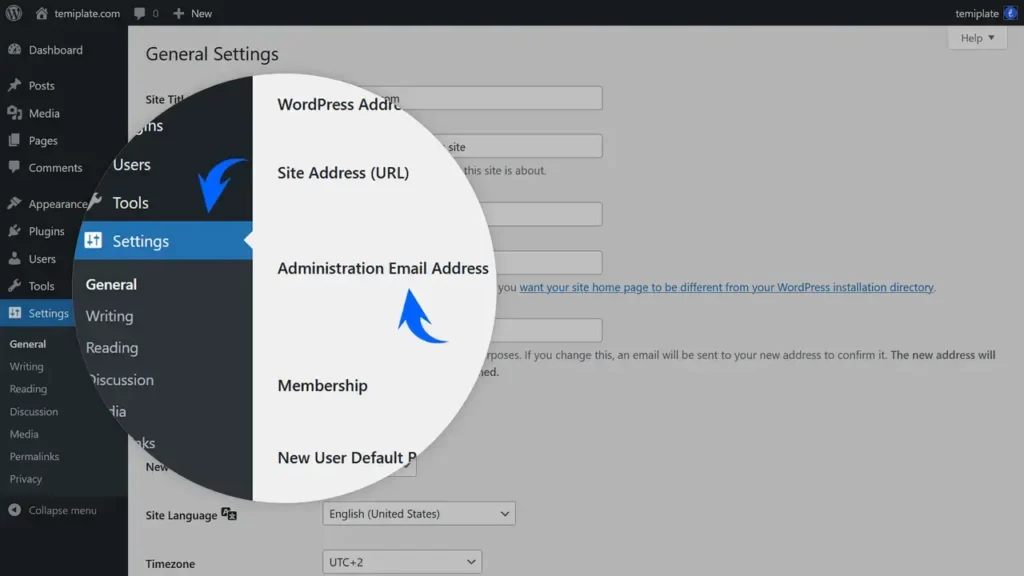
Why Change the Administration Email Address? It is highly recommended to switch to a business email address containing your domain name, such as “[email protected]”. This change serves several critical purposes:
- Professionalism: Using an email address with your domain name projects professionalism and credibility to your website visitors and customers.
- Clarity: It distinguishes this address as the official source for automated emails sent from your website, such as contact form submissions, notifications, marketing communications, and admin-related messages.
- Delivery Assurance: Using your domain-based email address can help ensure that important emails, like password resets and site notifications, reach their intended recipients without getting lost in spam filters.
Changing Your Administration Email Address: To update your administration email address after installing WordPress, follow these straightforward steps:
- Access your WordPress Dashboard and navigate to “Settings,” then select “General.”
- Locate the “Administration Email Address” field and replace the existing email with the one you want to use.
- Ensure that the new email address is both valid and functional on your hosting platform. If you change it, WordPress will send a confirmation email to the new address.
- Confirm the email change by clicking the link provided in the confirmation email. Your new address will not become active until confirmed.
By addressing why it’s crucial to change the administration email and emphasizing the benefits of a domain-based email, your readers will better understand the significance of this change. The additional detail enhances the clarity and encourages users to make this important update to their WordPress settings.
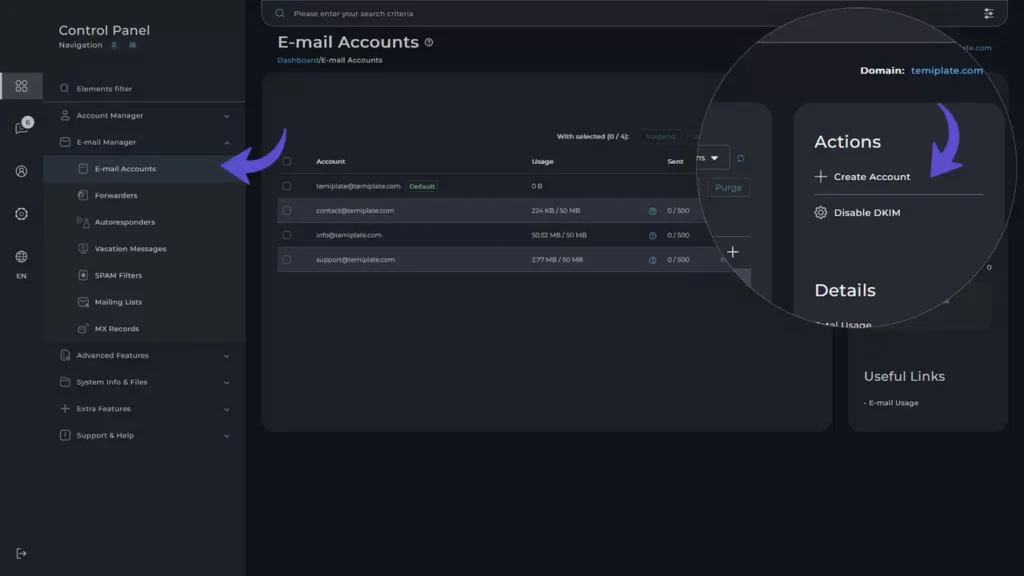
To create new email accounts in DirectAdmin go to DirectAdmin » E-mail Manager » E-mail Accounts » Create Account. Then enter the details such as Username and Password and E-mail Quota (MB). Don’t forget to test your business email account on the host webmail and be sure that it works fine.
To create new email accounts in CPanel go to CPanel » Email » Email Accounts » Create. Then enter the details such as Username and Password and click on the Create button. Don’t forget to test your business email account on the host webmail and be sure that it works fine.
17. Create a Navigation Menu
Almost every website on the planet has a navigation menu in its header! A navigation menu is a list of links pointing to the most important pages and categories of a website. It gives your site a great structure that helps visitors navigate from one page to another page and go to different areas of your website. After installing WordPress, You can have different navigation menus anywhere on your website like header, footer, sidebars, etc.
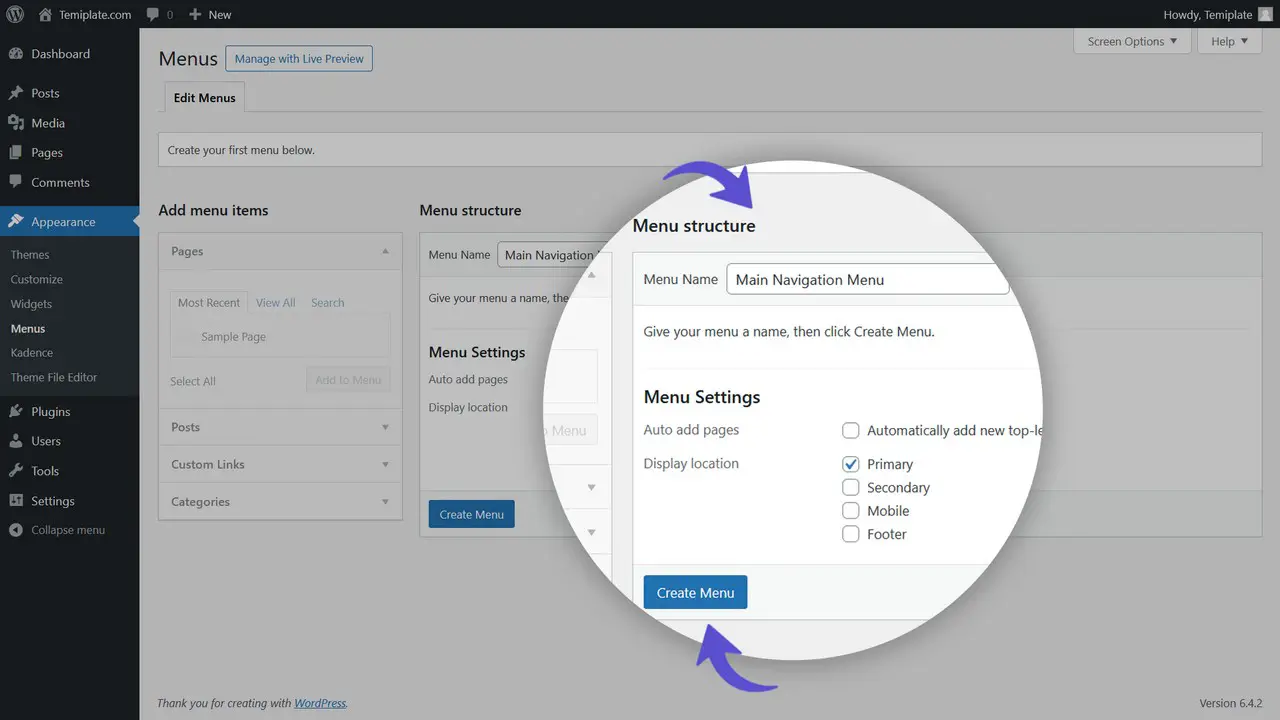
WordPress has a great menu and sub-menu generator in itself. After installing WordPress, You can create any number of menus you want for your website to show them anywhere on your website. Let’s create our first menu. To create a navigation menu in your WordPress website, you should go to the Dashboard » Appearance » Menus.
Important Note
If you don’t see the Appearance » Menus option on your site and see only Appearance » Editor (Beta), then that means you are using a theme that has Full Site Editing (FSE) enabled.
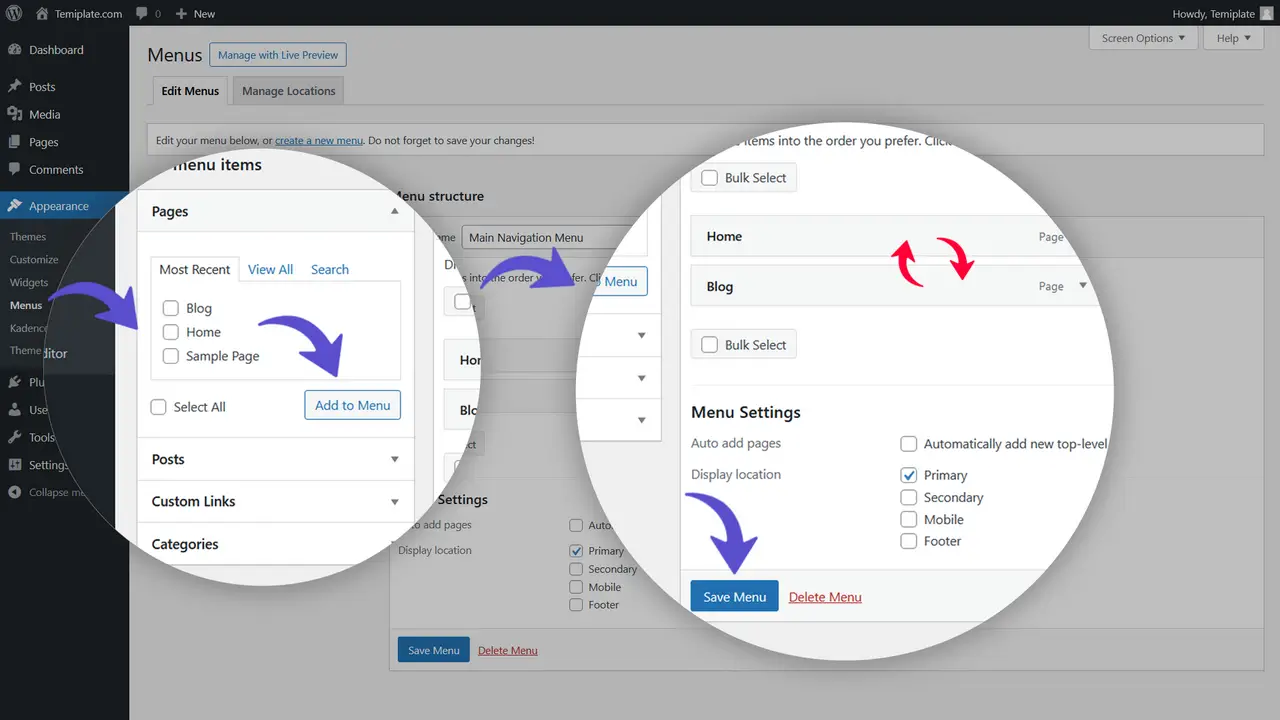
First, You should enter a name (like Main Navigation Menu) for your navigation menu. Then click on the Create Menu button. After that, your menu will be created and you can add your pages in a custom order using drag and drop.
At the bottom, there is a Menu Settings section. Make sure the Auto Add Pages option is unchecked. You don’t need WordPress to add all your pages automatically to the menu. Because Lots of your pages are not important enough to be in the menu.
The next setting is Display Location for your menu. Depending on the theme you are using, there are several locations to display your menu. As we want to have a menu for our main header after installing WordPress, we should check the Primary option.
Finally, click on the Save Menu button and go to the next part of this article.
18. Add and Manage Widgets
Widgets are small elements that can be added to the sidebar, footer, or other widget-ready areas of a WordPress website. They can be used to display different types of content, such as a search bar, recent posts, archives, categories, tags, custom menus, text, images, videos, and more.
To add widgets to your website after installing WordPress, you can go to the Dashboard » Appearance » Widgets section in the WordPress dashboard. From there, you can drag and drop different widgets to the widget areas of your website. You can also configure the settings of each widget and control how it will be displayed on your website.
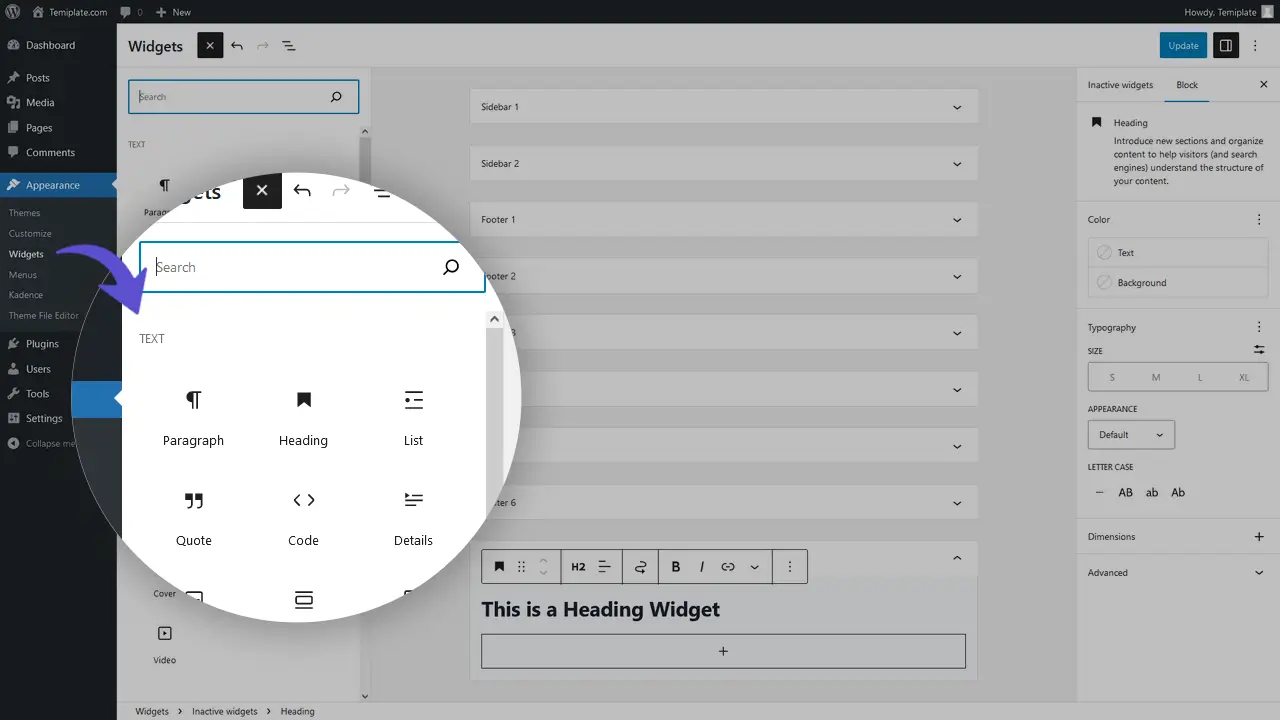
WordPress comes with several built-in widgets, and you can also add new widgets by installing third-party plugins. Widgets are useful a feature in WordPress that allows you to customize the layout and functionality of your website without requiring any coding skills.
Adding and managing widgets after installing WordPress can be done in a few simple steps:
- Go to the WordPress dashboard and click on “Appearance” in the left-hand menu.
- Click on “Widgets” to open the widgets screen.
- On the right-hand side, you will see a list of available widgets.
- On the left-hand side, you will see a list of widget areas, such as “Sidebar” or “Footer”.
- To add a widget, simply drag and drop it from the available widgets list to the widget area where you want it to appear.
- You can also click on a widget to expand its settings and configure it as needed.
- To remove a widget, simply drag it out of the widget area and back to the available widgets list.
- You can also rearrange widgets within a widget area by dragging and dropping them into the desired order.
Some things to keep in mind when adding and managing widgets after installing WordPress:
- Not all WordPress themes support the same widget areas, so you may need to switch themes to access certain widget areas.
- Some plugins may add their widgets to the available widgets list, so you may have additional options depending on which plugins you have installed.
- Depending on your theme and settings, widgets may appear differently on different pages of your site, or may only appear on certain pages.
- Widgets are a great way to add functionality and content to your site without needing to know how to code, but be careful not to overload your site with too many widgets, as this can slow down your site and make it harder to navigate.
19. Check WordPress Site Health
Site Health is a built-in feature in WordPress that helps you monitor the overall health of your website. It checks for any issues or problems that may affect your website’s performance or security. It is important always to have a look at “Site Health” and solve the issues that need to be fixed.
To access Site Health after installing WordPress, We should go to our Dashboard » Tools » Site Health, then we can see all WordPress Site Health Settings. Here are some of the settings that you can configure in Site Health:
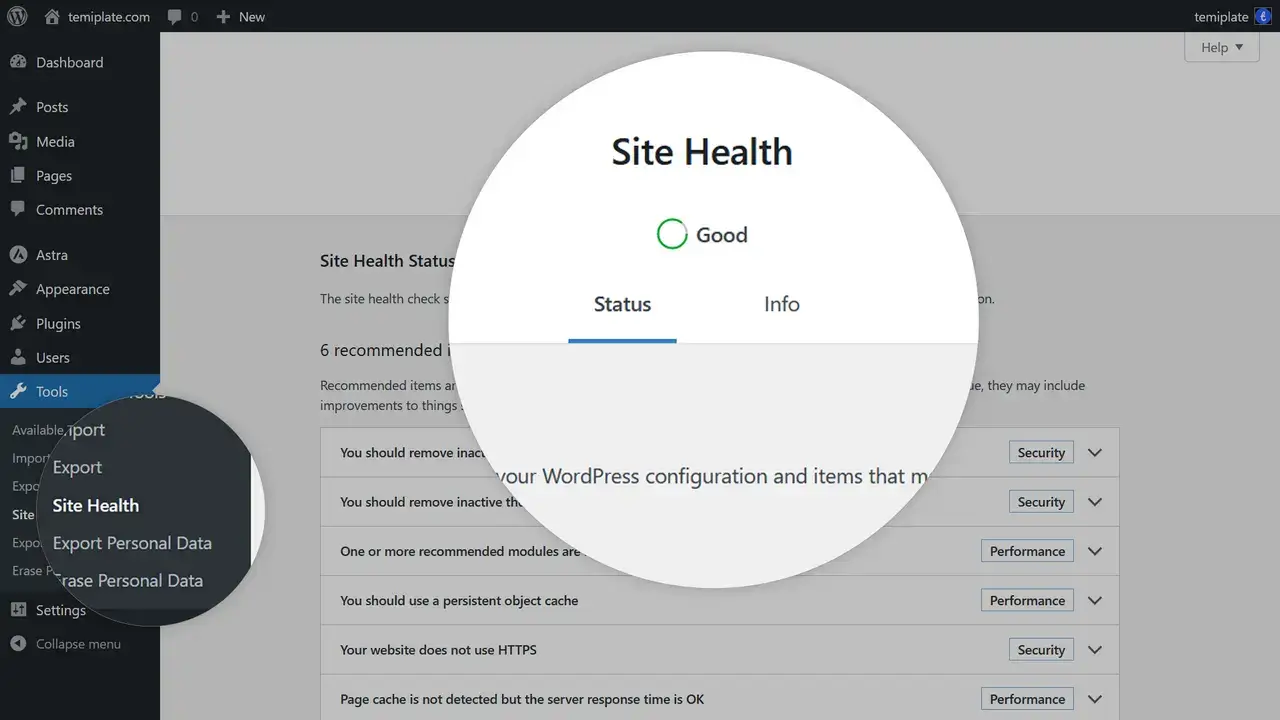
- Site Health Status – This section displays an overall health score for your WordPress website configuration, along with any issues or recommendations that need attention. It provides a score out of 100, based on several factors, including security, performance, and maintenance. If any issues need attention, they will be displayed in the Site Health Status section, along with recommendations for how to resolve them. For example, if you have outdated plugins or themes after installing WordPress, Site Health will suggest updating them to the latest version for improved security and performance.
- Site Health Info – This section shows information about your server, WordPress installation, and other technical details that may be useful for troubleshooting. The Info section in Site Health provides detailed technical information about your WordPress installation, server environment, and other relevant details. This includes your WordPress version, active theme and plugins, PHP version, database version, and more.
Overall, Site Health is a useful tool for keeping your WordPress website running smoothly and securely. You can also install and activate the “Health Check & Troubleshooting” plugin from the WordPress repository for more health settings.
20. Disable XML-RPC in WordPress
XML-RPC is a Remote Procedure Call (RPC) protocol that allows external services to communicate with WordPress. However, this protocol can also be used by attackers to perform brute-force attacks, DDoS attacks, and other malicious activities. Therefore, disabling XML-RPC after installing WordPress can help improve the security of your WordPress site.
Here are the two best ways to disable XML-RPC after installing WordPress:
- Using a Plugin: The easiest way to disable XML-RPC is by using a plugin. There are several plugins available in the WordPress repository that can help you disable XML-RPC with a single click. The most popular plugins for this purpose are Disable XML-RPC, Disable XML-RPC-API, Wordfence Security, iThemes Security, etc.
Note: If you plan to have a WordPress Security plugin in the future, we recommend not installing an individual special plugin just for XML-RPC! It’s better to install a Security Plugin after installing WordPress that has settings for disabling XML-RPC, Like iThemes Security or Wordfence Security.
- Using Code Snippet: If you prefer to disable XML-RPC without using a plugin, you can do so by adding a code snippet. There are two ways to disable XML-RPC using a code snippet:
a) Theme functions.php: (Dashboard » Appearance » Theme Editor » functions.php » add the following code snippet at the end of the file)
b) Code Snippet Plugin: (Dashboard » Plugins » Add New » Install and Activate Code Snippets Plugin » Add New » PHP Code Snippet » add the following code snippet and save!)
add_filter('xmlrpc_enabled', '__return_false');After disabling XML-RPC, you should test your site to make sure that everything is working correctly. If you experience any issues, you can always enable XML-RPC again by reversing the steps outlined above.
Part 3: Installing Necessary Tools: In the last part of this tutorial, we want to consider installing the necessary tools and plugins that each website must have after installing WordPress. Check out the following items and see if you need specific software for your website or not.
21. Setup SSL Certificate on WordPress
SSL (Secure Sockets Layer) is necessary for a website. SSL is a security protocol that encrypts the communication between a website and a user’s web browser, making it more difficult for third parties to intercept and read the data being transmitted.
SSL is particularly important for websites that collect sensitive information from users, such as login credentials, credit card information, or personal data. Without SSL, this information can be intercepted by attackers, potentially leading to identity theft, fraud, or other security risks.
In addition to improving website security, SSL also has other benefits. For example, search engines like Google now prioritize secure websites in search results, meaning that SSL can improve your website’s SEO and help drive more traffic to your site.
Overall, SSL is an essential component of website security and should be used by all websites, especially those that collect sensitive information from users.
To activate SSL after installing WordPress website, you need to follow these steps:
- Purchase an SSL certificate: First, you need to purchase an SSL certificate from a reputable SSL provider. Many web hosts offer free SSL certificates through Let’s Encrypt, ZeroSSL, or similar services. If your web host doesn’t offer SSL certificates, you can purchase one from a trusted SSL provider.
- Install the SSL certificate: Once you have purchased an SSL certificate, you need to install it on your web server. Your web host may provide instructions on how to install the certificate, or you can contact their support team for assistance.
- Activate SSL on WordPress: After installing the SSL certificate on your web server, you need to activate SSL on WordPress. There are two methods to Properly Move WordPress from HTTP to HTTPS. You can set up SSL/HTTPS in WordPress using a plugin or do it manually! if you like dealing with codes, search “How to set up SSL/HTTPS on WordPress manually” and do so! otherwise, we recommend you use a plugin like “Really Simple SSL“, “WP Force SSL“, etc. These plugins detect your SSL certificate automatically and set up all of your links, images, videos, contents, and other media to use HTTPS.
- Test your SSL certificate: Finally, you should test your SSL certificate to ensure that it is working properly. You can use a tool like “SSL Checker” to verify that your SSL certificate is installed correctly and that your website is using HTTPS.
By following these steps, you can activate SSL on your WordPress website and ensure that your website is secure and protected.
22. Setup Your Favorit WordPress Theme
A WordPress theme is a collection of files that work together to create the design and functionality of a WordPress website. It includes a set of templates, stylesheets, and other files that control the look and feel of your website.
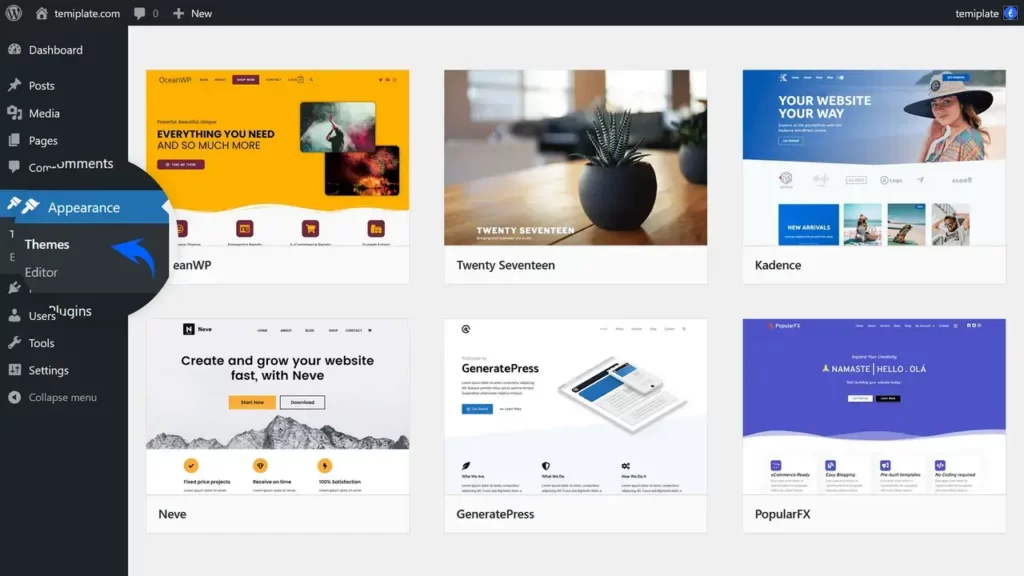
The theme determines the overall layout, color scheme, typography, and other visual elements of your website. It also includes the code that enables certain functionalities, such as menus, widgets, and page templates.
WordPress themes are important because they allow you to quickly and easily customize the appearance and functionality of your website without the need for advanced coding skills. With thousands of free and premium themes available, you can choose a theme after installing WordPress that suits your needs and preferences, and easily modify it to create a unique website that reflects your brand.
In summary, a WordPress theme is the design and functionality framework for your website. It determines how your website looks and behaves, and plays a key role in creating a positive user experience for your visitors.
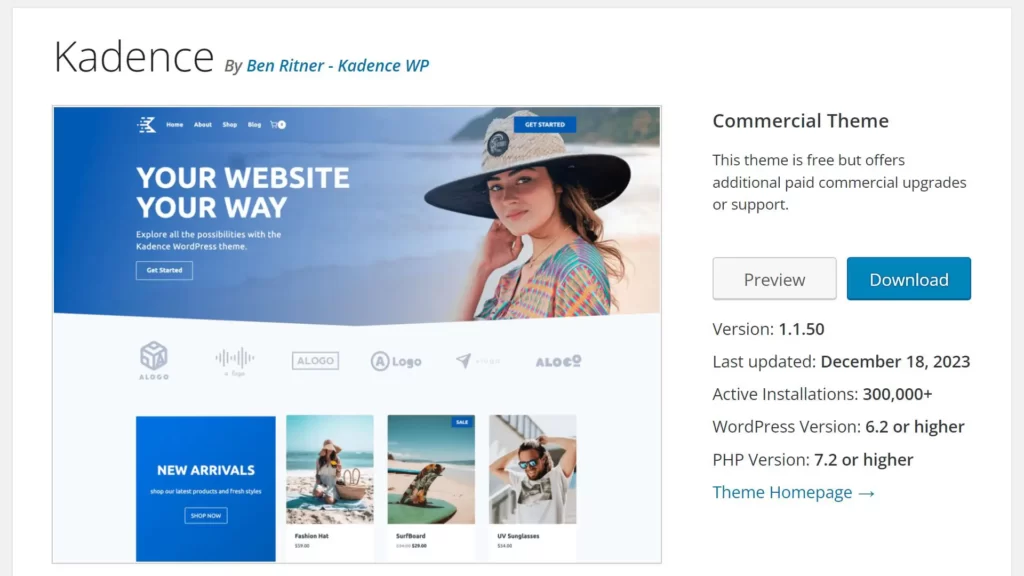
There are many great WordPress themes available, both free and paid. The best one for you will depend on your specific needs and preferences. Here are some popular themes that are well-regarded by WordPress users that you can consider after installing WordPress:
- Kadence (Free & Premium) – It’s a lightweight and fast theme that offers a lot of customization options, making it suitable for a wide range of websites, from blogs to e-commerce stores. Check Kadence Pro!
- Astra (Free & Premium) – A lightweight, customizable, and beginner-friendly theme that is perfect for building any type of website. Check Astra Pro!
- GeneratePress (Free & Premium) – A fast and flexible theme that can be easily customized and is compatible with popular page builders. Check GeneratePress Premium!
- OceanWP (Free & Premium) – A fully responsive theme that offers a wide range of customization options and is suitable for any type of website. Check OceanWP Premium!
- Divi (Premium) – A popular and versatile theme that comes with a visual drag-and-drop page builder, making it easy to create custom designs. Check Divi Theme!
- Avada (Premium) – One of the best-selling WordPress themes of all time, Avada offers a powerful and flexible design with a wide range of pre-built templates. Check Avada Theme!
These are just a few examples of the many great WordPress themes available. You can check and install one of the Fastest WordPress Themes to get better points in SEO. You can browse and search for themes directly within your “WordPress Dashboard“, or on the official “WordPress.org Themes Repository“. It’s important to choose a theme after Installing WordPress that is regularly updated, well-supported, and compatible with the latest version of WordPress.
23. Setup an Automatic Backup System
Setting up an automatic backup system for your website after installing WordPress is important to ensure that your site’s data is always safe and secure. Here are the steps to set up an automatic backup system for your WordPress site:
- Choose a backup plugin: There are many backup plugins available for WordPress, both free and paid. Some popular options include UpdraftPlus, Duplicator, All-in-One WP Migration, BackupBuddy, and Jetpack. Choose one that suits your needs and install it on your WordPress site.
- Configure backup settings: Once you’ve installed a backup plugin, configure its settings to set up automated backups. Typically, you’ll be able to choose the frequency of backups (daily, weekly, etc.), the type of backup (full or incremental), and where the backup files will be stored (such as your server or a third-party cloud storage service like Dropbox or Google Drive).
- Test your backup system: After setting up the automated backup system, it’s important to test it to make sure that the backups are being created and stored correctly. You can do this by manually restoring a backup and checking that your website is working properly.
- Set up backup notifications: Many backup plugins offer notifications to let you know when a backup has been completed or if there are any issues with the backup process. This can help ensure that your backup system is working as expected.
- Regularly check backup files: It’s a good idea to periodically check the backup files to ensure that they are up-to-date and that there are no issues with the backup process. You should also store the backup files in a secure location, such as an off-site location or a third-party cloud storage service.
By following these steps, you can set up an automated backup system for your WordPress website, ensuring that your site’s data is always safe and secure.
24. Setup a WordPress Security Plugin
Setting up a WordPress security plugin is an important step in securing your website and protecting it from potential threats. Here are the steps to set up a security plugin after Installing WordPress:

- Choose a security plugin: There are many security plugins available for WordPress, both free and paid. Some popular options include iThemes Security, Wordfence, and Sucuri Security. Choose one that suits your needs and install it on your WordPress site.
- Configure security settings: Once you’ve installed a security plugin, configure its settings to set up the security features that you want to enable. Some common security features include:
- Firewall: A firewall can help block malicious traffic from accessing your website.
- Malware scanner: A malware scanner can scan your website for malware and alert you if any is found.
- Two-factor authentication: Two-factor authentication adds an extra layer of security to your login process, requiring a second form of authentication in addition to your password.
- Login protection: Login protection can help prevent brute-force attacks by limiting the number of login attempts from a single IP address.
- Blacklist monitoring: Blacklist monitoring can alert you if your website is listed on any blacklists, indicating that it may have been compromised.
- Set up alerts and notifications: Many security plugins offer alerts and notifications to let you know if there are any security issues with your website. Set up these alerts and notifications to ensure that you’re aware of any potential threats.
- Regularly update the plugin: It’s important to keep your security plugin up-to-date to ensure that it’s providing the best possible protection for your website. Make sure to regularly update the plugin to the latest version.
By following these steps, you can set up a WordPress security plugin to help protect your website from potential threats after installing WordPress. Keep in mind that no security plugin can guarantee 100% protection, so it’s important to also follow best practices for WordPress security, such as using strong passwords, regularly updating your plugins and themes, and limiting user access to your website.
25. Setup a Drag & Drop Page Builder
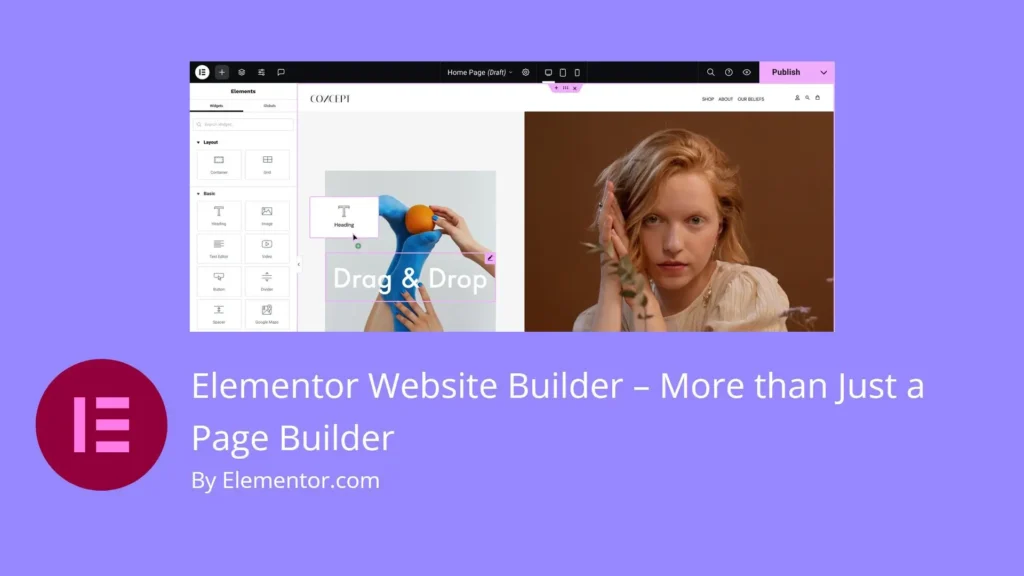
There are several great WordPress page builders available, each with its own set of features and benefits. The best page builder for you depends on your specific needs and preferences. Here are some of the most popular WordPress page builders that you can use after Installing WordPress:
Important Note
If you’re using a WordPress theme that has a built-in page builder, completely forget about setting up an individual page builder on your site. More than a page builder on a site will have bad effects on performance and speed. Too many cooks spoil the broth!
- Gutenberg: As you know, Gutenberg used to be just a WordPress editor for a few years. But now, It is converting to a page builder and each day it’s getting better and better than page builders. It has great performance and speed. It’s going to be a built-in page builder for WordPress Core.
- Elementor: Elementor is a powerful, user-friendly page builder with a drag-and-drop interface that allows you to create custom page designs quickly and easily. It comes with a range of pre-built templates and widgets and offers a lot of flexibility in terms of customization options.
- Beaver Builder: Beaver Builder is another popular page builder that is known for its intuitive interface and range of customization options. It comes with a range of pre-built templates and modules and allows you to create complex page layouts using its drag-and-drop interface.
- Divi: Divi is a popular page builder and theme that offers a lot of flexibility and customization options. It comes with a visual editor and a range of pre-built templates and modules and allows you to create complex page designs without any coding knowledge.
- Thrive Architect: Thrive Architect is a page builder that is designed to help you create high-converting landing pages and sales pages. It comes with a range of pre-built templates and modules and offers a lot of customization options to help you create pages that are optimized for conversions.
- WPBakery Page Builder: WPBakery Page Builder (formerly known as Visual Composer) is a popular page builder that allows you to create custom page designs using its drag-and-drop interface. It comes with a range of pre-built templates and modules and offers a lot of customization options.
All of these page builders have their strengths and weaknesses, and the best one for you depends on your specific needs and preferences. If you’re new to page builders, we recommend trying out a few of them after installing WordPress to see which one works best for you.
26. Optimization: Chaching and Speed
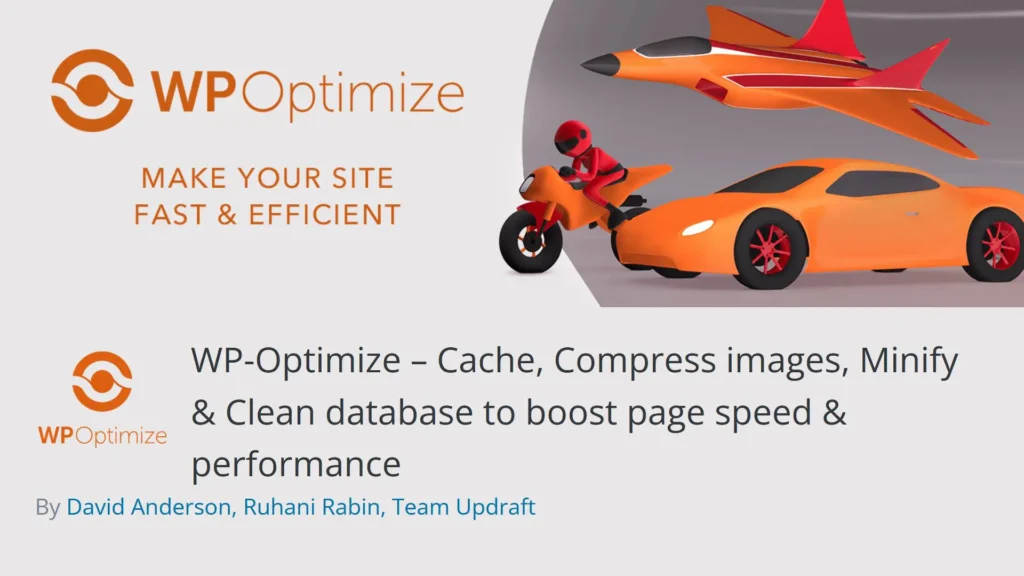
When a user visits a website, the server has to fetch all the necessary files, images, and data to display the webpage, which can take time, especially if the website has a lot of visitors or large files. Setting up a caching optimization plugin is a great way to speed up your WordPress website and improve its overall performance.
Studies show that just 1 second delay in page load time can lead to a 7% loss in conversions, 11% fewer page views, and a 16% decrease in customer satisfaction. Caching plugins are an essential tool for optimizing WordPress site performance, improving user experience, and boosting search engine visibility. Let’s check the steps below to set up a caching plugin for your WordPress website optimization:
- Choose a caching plugin: There are many caching plugins available for WordPress, both free and paid that you can install to optimize your site after Installing WordPress. Some popular options include WP Rocket, WP-Optimize, WP Super Cache, W3 Total Cache, and LiteSpeed Cache. Choose one that suits your needs and install it on your WordPress site.
- Configure caching settings: Once you’ve installed a caching plugin, configure its settings to enable caching for your website. Depending on the plugin, you may need to configure settings such as page caching, object caching, and database caching.
- Enable minification and compression: Many caching plugins also offer options for minification and compression. Enabling these options can help reduce the size of your website’s CSS and JS files, making your website load faster.
- Optimize images: Images can be a major contributor to slow website loading times. We highly recommend using tools like tinypng.com to optimize your images before uploading them to your site. We also recommend using image formats like .webp or .svg to have low-size images on your site. Otherwise, you can use an image optimization plugin, such as Imagify, Smush, Optimole, EWWW Image Optimizer, or TinyPNG, to compress and optimize your images for faster loading.
- Use a content delivery network (CDN): A CDN can help speed up your website by distributing your website files across multiple servers around the world. Many caching plugins offer integration with popular CDNs such as Cloudflare, Bunny.net, or MaxCDN.
- Regularly monitor your website performance: After setting up your caching plugin and optimizing your site, regularly monitor your website performance using a tool such as GTmetrix, Pingdom, or Google PageSpeed Insights. This can help you identify any performance issues and make adjustments to your caching settings as needed.
Keep in mind that the specific settings and features of each plugin may vary, so it’s important to consult the plugin’s documentation or support resources for more information.
27. SEO (Search Engine Optimization)
Search engine optimization (SEO) is the process of improving the quality and quantity of website traffic to a website or a web page from search engines. WordPress SEO plugins are tools that help you optimize your website for search engines, such as Google, Bing, and Yahoo. They typically include a range of features and settings that allow you to customize various aspects of your website’s SEO, such as meta tags, keywords, and content optimization.

SEO plugins can help improve your website’s search engine rankings by providing guidance and recommendations for optimizing your content and structure. Some popular SEO plugins for WordPress include Rank Math, Yoast, All in One SEO Pack, and SEOPress.
SEO Plugins can do a lot for your website, including, Meta tags optimization, Content optimization, XML sitemap generation, Social media integration, Analytics integration, etc. However, keep in mind that SEO is a complex and ongoing process, and using a plugin alone may not be enough to achieve high rankings. You may also need to focus on creating high-quality content, building backlinks, and other SEO strategies to achieve the best results.
Let’s check what should we do after installing WordPress for setting up and configuring a WordPress SEO plugin:
- Install and activate the plugin: After logging into the admin area of your WordPress, Go to the Dashboard » Plugins » Add New. Then Search for the SEO plugin you want to use, such as Rank Math, and install and activate it. All SEO plugins in the WordPress repository have a paid version that you can buy if you need more features.
- Configure the general settings: After activating the plugin, go to its settings page and configure the general settings. This includes setting up your website’s title and meta description, enabling advanced settings, and configuring other basic settings.
- Set up XML sitemaps: Most SEO plugins, including Rank Math SEO, allow you to generate XML sitemaps for your website. This can help search engines crawl and index your pages more efficiently. Go to the plugin’s XML sitemap settings and follow the instructions to generate your sitemap.
- Configure social settings: If you want to optimize your content for social media platforms, configure the social settings in your SEO plugin. This includes setting up social meta tags, enabling social sharing buttons, and configuring other social-related settings.
- Optimize individual pages and posts: With an SEO plugin installed, you can optimize individual pages and posts for search engines. For example, you can set the focus keyword, optimize the title and meta description, and use the plugin’s content analysis tool to improve your content.
- Monitor your website’s SEO performance: After setting up your SEO plugin, monitor your website’s SEO performance using tools such as Google Analytics, Google Search Console, or the SEO plugin’s own built-in analytics. This can help you identify areas for improvement and adjust your SEO settings accordingly.
28. Setup Google Analytics
Google Analytics is a powerful tool that can provide you with valuable insights about your website’s traffic and user behavior. It can help you understand how visitors interact with your site, what content is most popular, and where visitors are coming from. Here are some steps to install and configure Google Analytics for your WordPress site:
- Create a Google Analytics account: If you don’t have a Google Analytics account yet, you’ll need to create one. Go to the Google Analytics website (https://analytics.google.com/) and sign up for a free account. Once you’ve signed up, you’ll be prompted to create a new tracking code.
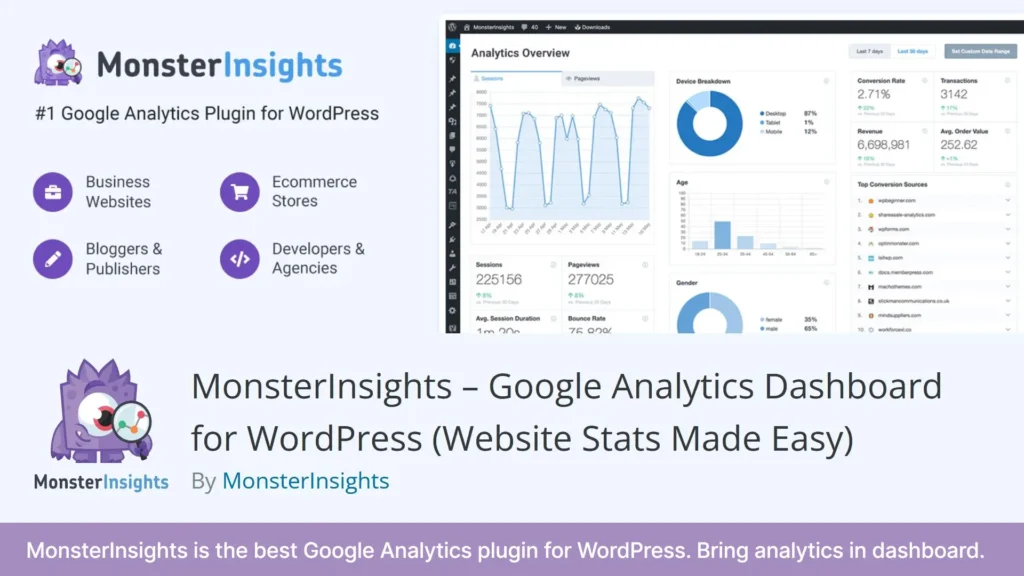
- Install a Google Analytics plugin: The easiest way to add Google Analytics tracking to your WordPress site is by using a plugin. There are several free and paid plugins available, such as MonsterInsights, Google Analytics Dashboard for WP, and Analytify. Install and activate the plugin of your choice.
- Connect your website to Google Analytics: Once you’ve installed the plugin, you’ll need to connect your website to your Google Analytics account. Depending on the plugin you choose, you may be prompted to enter your Google Analytics tracking ID or connect your account using OAuth.
- Configure the plugin settings: Most Google Analytics plugins for WordPress will have settings that you can configure to suit your needs. For example, you may want to exclude certain pages or user roles from tracking or set up event tracking to measure specific user interactions.
- Test and verify: Once you’ve configured the plugin settings, make sure to test and verify that Google Analytics tracking is working correctly. You can do this by visiting your website and checking the Real-Time reports in your Google Analytics account to see if your visits are being tracked.
Overall, Google Analytics can be a valuable tool for gaining insights into your website’s traffic and user behavior. By installing and configuring a Google Analytics plugin for your site after installing WordPress, you can have full control over your website’s analytics and use the data to make informed decisions about your website’s content, design, and marketing strategies.
29. Setup a Form Builder Plugin
Whether or not you need a form builder for your WordPress site depends on your specific needs and goals. However, in general, adding a form builder plugin to your website can be a useful and valuable addition for a number of reasons. Form Builders can be useful for Contact forms, User Feedback, Lead Generation, Event registration, Product Inquiry, etc. So, depending on your website’s purpose, a form builder plugin can be a valuable tool that helps you to engage with your website visitors, collect data, and generate leads.
Here’s a general guide for choosing, installing, and configuring a form builder plugin for your site after installing WordPress:
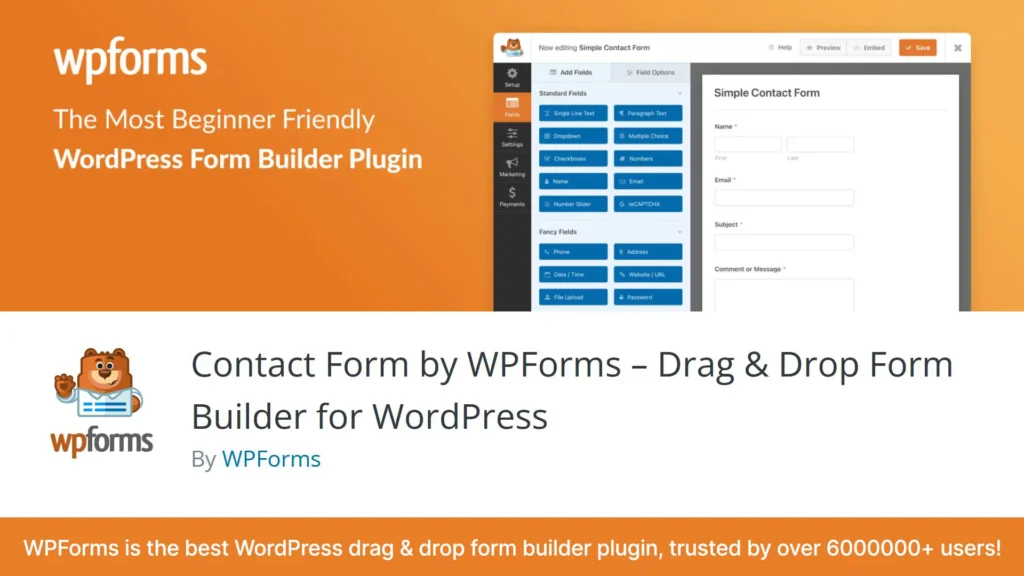
- Choose your form builder plugin: There are many free and paid “Form Builder” plugins available for WordPress, such as WPForms, Gravity Forms, Formidable Forms, Ninja Forms, Fluent Forms, etc. Choose the one that suits your needs and install it. You can also do this by going to the “Plugins” section of your WordPress dashboard, selecting “Add New”, and searching for Form Builder or the plugin by name. Once you find it, click “Install” and then “Activate” to enable it on your site.
- Create a new form: Once the plugin is installed and activated, you can create a new form by navigating to the plugin’s settings page. This location may vary depending on the plugin you choose, but most form builders will have a “Forms” or “Form Builder” tab in your WordPress dashboard menu. Once you find the right settings page, look for an “Add New” button or a similar call-to-action to create a new form.
- Customize the form: Once you’ve created a new form, you can start customizing it to suit your needs. Most form builders will allow you to drag and drop different form fields to create your ideal form layout. You can also set up any custom fields or questions you need to gather the information you want from your website visitors.
- Configure form settings: Depending on the form builder plugin you choose, there may be additional settings you need to configure before your form is live. These settings can include things like form notifications, custom thank-you pages, and more. Make sure to explore the plugin’s settings to ensure you’re taking advantage of all the features available to you.
- Embed the form on your site: Once you’ve finished customizing your form and configuring the settings, you’ll need to embed the form on your website. Most form builders will provide you with a “shortcode” or “embed code” that you can copy and paste into a page or post on your website. Alternatively, you may be able to use a “widget” or “block” to display your form in a sidebar or other location on your website.
That’s a basic overview of how to install and configure a form builder plugin in WordPress. Remember to test your form thoroughly to ensure it’s working as expected and capturing the information you need from your website visitors.
30. Setup Spam Protection 😎
Using a spam protection plugin for your WordPress website can be beneficial in several ways:
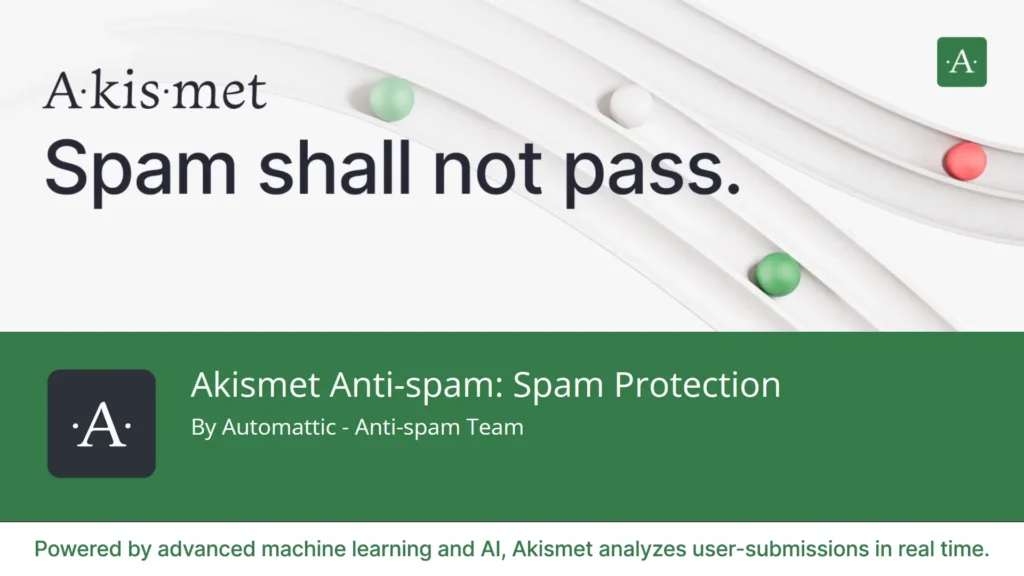
- Spam prevention: A spam protection plugin helps to prevent spam comments and form submissions on your website. This can save you time and effort in moderating and filtering out unwanted messages.
- Improved security: Spam comments and form submissions can contain harmful links or codes that can compromise your website’s security. A spam protection plugin can help to prevent these types of attacks.
- Better user experience: Spam comments and form submissions can clutter your website and create a negative user experience. By preventing spam, you can provide a cleaner and more pleasant experience for your visitors.
When it comes to finding the best spam protection plugin for your WordPress site, there are several options available. Some of the most popular plugins include Akismet, Antispam Bee, and WP-SpamShield.
Here are the steps to install and configure a spam protection plugin for your WordPress website:
- Install the plugin: Go to your WordPress dashboard and navigate to Plugins Add New. Search for the spam protection plugin of your choice, and install and activate it.
- Configure the plugin settings: Once you’ve activated the plugin, you’ll need to configure its settings. The settings may vary depending on the plugin you choose, but most will have options for blocking or filtering spam comments and form submissions.
- Test the plugin: Once you’ve configured the plugin settings, test it to make sure it’s working correctly. You can do this by submitting a test comment or form submission with spammy content to see if it gets blocked.
- Monitor the plugin: Keep an eye on the plugin to ensure that it continues to work effectively. Some plugins may require periodic updates or adjustments to their settings to keep up with new spamming techniques.
Overall, a spam protection plugin can be a valuable addition to your WordPress website to prevent spam comments and form submissions, improve security, and enhance user experience.
31. Setup Your Privacy Policy
Having a privacy policy for your WordPress website is important to let your visitors know how you collect, use, and protect their personal information. While there are online privacy policy generators available, it’s always best to write your own privacy policy specific to your website to ensure that it accurately reflects your privacy practices.
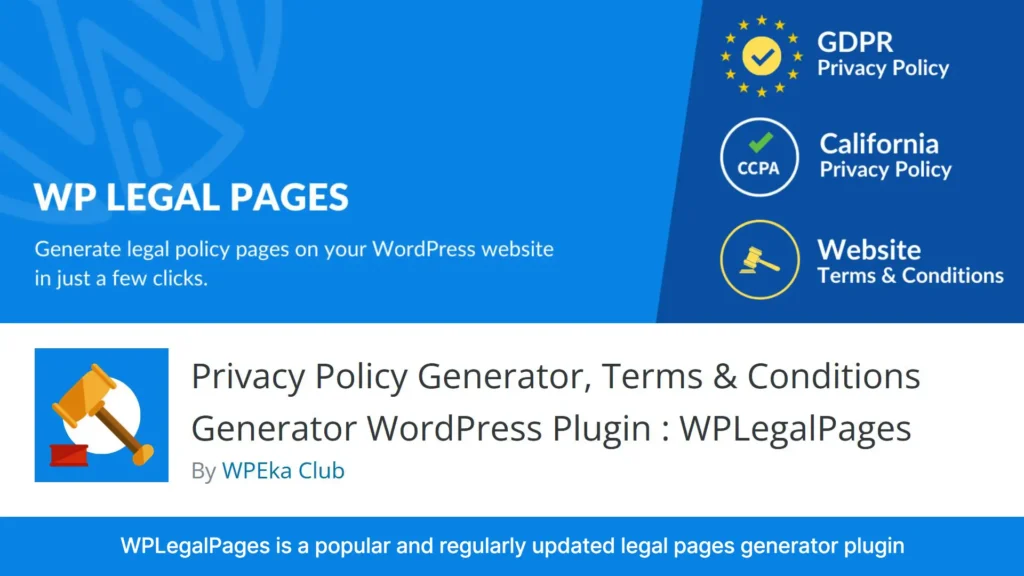
Here are some steps to help you write a privacy policy for your WordPress website:
- Understand your data collection practices: Review your website and identify what personal data you collect, such as email addresses or contact form submissions.
- Determine how you use personal data: Identify the purposes for which you collect personal data, such as sending newsletters or processing orders.
- Determine who has access to personal data: Identify who within your organization has access to personal data and who you may share data with, such as payment processors or shipping companies.
- Address cookies and third-party services: If you use cookies or have third-party services on your website, such as Google Analytics, address how they collect and use data.
- Address data security: Explain how you protect personal data from unauthorized access and what measures you take to ensure data security.
- Include contact information: Provide contact information for users to contact you with any questions or concerns about their personal data.
If you’re not comfortable writing your own privacy policy, you can use an online privacy policy generator to create a basic policy. However, keep in mind that the generated policy may not be specific to your website and may not accurately reflect your privacy practices. Some popular online privacy policy generators include Privacy Policies and TermsFeed.
Overall, it’s best to write your own privacy policy for your WordPress website to ensure that it accurately reflects your privacy practices. This will help build trust with your visitors and demonstrate your commitment to protecting their personal information.
32. Setup Your Terms and Conditions
Terms and Conditions (T&C) are an important legal agreement that sets out the terms and conditions under which your website can be used. While not legally required, having T&C on your WordPress website can help protect your rights and limit your liability.
Here are some key elements that should be included in your T&C:
- User agreement: Set out the terms and conditions under which users can access and use your website.
- Intellectual property rights: Clearly state who owns the intellectual property rights of the content on your website, such as text, images, and videos.
- Liability disclaimer: Limit your liability for any damages or losses that may result from the use of your website.
- Payment terms: If you offer products or services for sale on your website, include payment terms, such as payment methods, pricing, and refund policies.
- User-generated content: If users can post content on your website, include rules on what is acceptable and what is not, and state that you reserve the right to remove any inappropriate content.
- Dispute resolution: Include a section on how disputes will be resolved, such as through arbitration or mediation.
- Governing law: State which laws govern your agreement and which courts have jurisdiction in the event of a dispute.
If you’re not comfortable writing your own T&C, you can use an online T&C generator to create a basic agreement. However, keep in mind that the generated T&C may not be specific to your website and may not accurately reflect your terms and conditions. Some popular online T&C generators include TermsFeed and FreePrivacyPolicy.
Overall, having T&C on your WordPress website can help protect your rights and limit your liability. Make sure to consult with a legal professional to ensure that your T&C accurately reflects your terms and conditions and complies with applicable laws and regulations.
33. Setup an Ecommerce (If Needed)
Yes, WooCommerce is a popular e-commerce plugin for WordPress that allows you to easily create an online store and sell products and services on your website. It is a free and open-source plugin that can be easily installed from the WordPress plugin repository.

WooCommerce is useful for a variety of e-commerce businesses, from small online stores to large enterprise-level websites. It offers a wide range of features, including:
- Product management: You can easily manage your products and services from the WordPress dashboard, including adding descriptions, prices, images, and inventory.
- Payment gateways: WooCommerce supports a variety of payment gateways, including PayPal, Stripe, and many others, making it easy for customers to make purchases.
- Shipping options: You can configure shipping options, rates, and methods for your products, including free shipping, flat rate shipping, and more.
- Tax options: You can configure tax rates and settings for your products based on your location and business needs.
- Customizable themes: You can choose from a variety of free and premium themes to customize the look and feel of your online store.
To install WooCommerce, follow these steps:
- Log in to your WordPress dashboard and go to the Plugins page.
- Click on “Add New” and search for “WooCommerce” in the search bar.
- Click on “Install Now” and then “Activate” to activate the plugin.
- Follow the setup wizard to configure your store settings, including payment and shipping options.
Once you’ve installed and configured WooCommerce, you can start adding products to your store, setting up payment and shipping options, and customizing the look and feel of your online store.
Overall, WooCommerce is a powerful and flexible e-commerce solution for WordPress that can help you create a professional and effective online store.
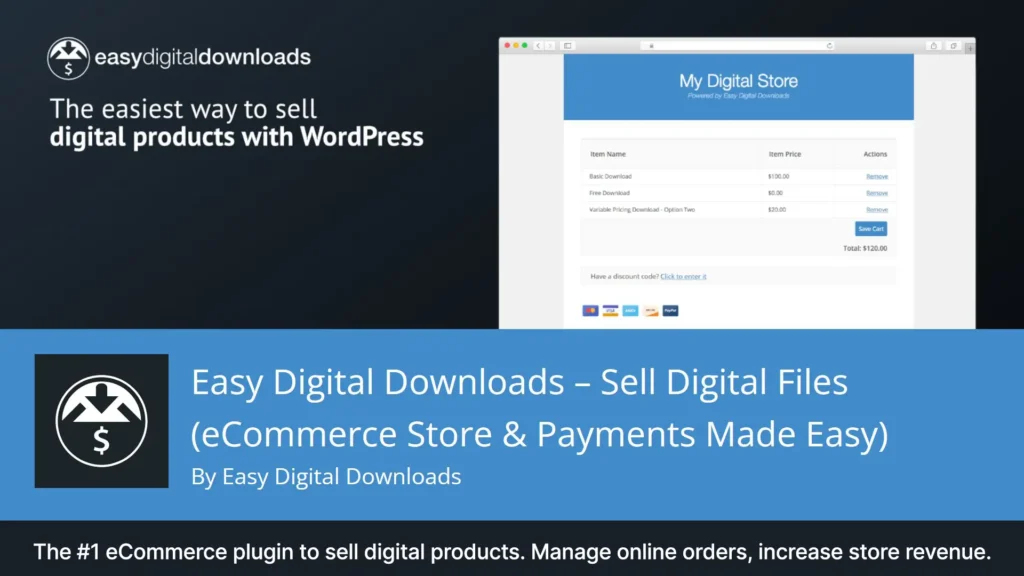
If you don’t want to use Woocommerce, there is another fantastic e-commerce plugin for WordPress, named Easy Digital Download (EDD). EDD, on the other hand, is a plugin that is specifically designed for selling digital products, such as software, eBooks, music, and other digital files. It is a lightweight plugin that is easy to use and provides all the features you need to sell digital products. EDD has a simple and clean interface that makes it easy to manage digital products, customers, and payments.

